Up next in 10

Master Laravel 12 CRUD Operations From Zero to Hero
Source code : https://www.tutussfunny.com/laravel-12-crud-application/
#laravelcrud#php#laravel12crud#laravel12
Show More Show Less View Video Transcript
0:00
hi friends welcome to T funny Channel today I'm going to teach lar 2 cred
0:07
application from the stretch okay so here recently larel 12 has been
0:14
released in February 24 uh L has been
0:20
release now let's do how to make the C operation using larel step by
0:27
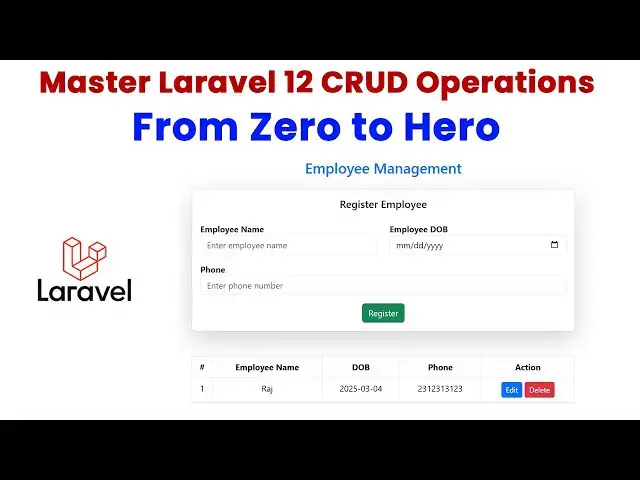
step okay so this is the simple UI design so let's go through uh go
0:33
through uh go through the thread based on this tutori okay so
0:42
first what I'm going to do is first I'm going to go to I'm going to go to G drive so I'm
0:50
going to make uh I'm going to go to F drive I'm going to make the folder which is
0:57
a l pro project okay inside this folder I'm
1:05
going to make my cred operations so what I'm going to is first
1:10
I'm going to go to the my respective website which is a
1:16
l okay I'm going to go to the L okay so L click on this this goes the respective you will
1:24
be able to see the respective now the L U UI interfaces look like this okay you can see here
1:30
okay so you can see everything here like okay so the LEL you can check it the
1:36
dock and everything they will they they change the UI design so you can if you want to
1:43
change all the things yeah if you're installation you can go here you go to the installation
1:50
here uh all here you can see the the the version now the version is 12 has been
1:57
released here uh recently the 12 has been released here they keep on they
2:04
updating for for the version 12 okay so this is version
2:09
12 version 12 you have select the version 12 so that you will be able to see the installation and all the process
2:15
you will be able to see how to install the Lal application for the Lal 12 okay
2:21
so just don't worry about the same thing like that uh before you did in the L 11
2:27
as well so what I'm going to do is so the first what I'm going to do is we let's go through here our installation
2:34
larable tol you have type this command composer create project l l this is my
2:41
project I'm going to create as L employee app okay so what I'm going to do this I'm going to go to over
2:48
here here this is my folder okay so I already created the folder Lal
2:53
Pro select the address bar and type CMP command press enter key get the command
3:01
from window here I'm going to type this command so how to type
3:06
composer create
3:12
project LEL SL
3:19
LEL write employer plus Enter key now you can see
3:26
here it will be if you type like this it will be it will be installing our
3:33
current version what the lest version it identify the lest version of L based on
3:39
the lest version all the things should be installed okay all the
3:44
relevant uh component will install okay okay you no
3:50
need to select the version and all okay if you type the previous command command
3:55
of this one okay it will be take off your latest version okay you don't need to specify the version and okay so that
4:03
it it automatically uh take the newest version and it it will
4:09
be uh proceed to install okay you have to wait until the installation process has been
4:15
completed after completed let's continue the video L 12 has been installed
4:21
successfully in your machine you will be able to see go to the go to our folder this is the F drive you will be able to
4:28
see the product project folder has been created the name of employer go inside
4:34
the folder here I'm going to type the address bar CMD hold space. to open the
4:41
folder in my vs code editor it has been open successfully
4:46
you'll be able to see now let's this all things and just close it now you can see
4:51
this is the folder structure of the project okay it's a folder structure of the project you will be able to see the
4:57
app folder this is the folder okay so this folder consist of HTTP here
5:04
we have we have managed the controller this a model model where it will be
5:09
communicate with the database and uh communicate the database and get
5:15
the data from the database and pass into the controller okay the model is very
5:21
important part where we communicate with through the databases after that another part which
5:27
is a route it will be manage it it should manage the URLs page all the page
5:34
URL page URL information managed by the routes after that there is another
5:39
folder which uh which is resources here we are we have displayed The View part
5:46
okay all the UI views display on this view part it will be managed by the
5:52
resources okay there are uh various folders are there the each folder
5:59
managed by by each task different task okay app it it managed by the app
6:06
consist of the model and controller resources controller uh resources folder
6:11
cons uh control the views and uh routes uh managed by the website Ur
6:19
management okay you have to understand this thing must this is the simple stuff
6:25
to manage the your larable projects after that TV5 what is this this is
6:32
nothing but this is this is nothing but manage the database information okay this is
6:40
nothing but managing the database information okay so databas information
6:46
mean so here we are we have we have a back end part okay here we we have to
6:53
set the database configuration so defaultly uh come as larable to SQL
6:59
light which is a database okay so if you want to go along with the SQL light you
7:06
can use it so in my in my project I'm going along with
7:12
the my SQL so most of the project we are going along with the MySQL so we have to
7:19
convert this as a MySQL so how we convert this this one as a
7:26
MySQL my connection you have to type as mysq SQL like you to connect as my my
7:34
my DB connection you have select as type as
7:39
my after that here you can see the all the port and uh database name username
7:47
everything there this is the uh database configuration so this one I'm going to
7:52
select all and all on the control key down and press
7:59
slash on your key so it will be onom now you can use this all things now here
8:06
based on your databased connection you have to use it so okay I installing the
8:11
Zam server in your machine Zam so so if you are if you change the username and
8:17
password you have to use it defaultly username and password uh come as the Zam server is
8:24
root is a username password is a black so the root and root is a username password is blank we don't need to
8:30
change everything so here we need to create the database okay so first you have to go to
8:37
admin so I'm going to create new database I'm going to give here as name
8:43
as uh you can see over here the first steps you have completed second step
8:49
I'll be explaining by default it's coming like SQL live after that you change the database which name is
8:57
JMS okay everything should be there okay so the go we have to change this
9:02
one as JMS so before that we have to create the database okay so we have to create the
9:09
database so the click new on your
9:14
MySQL PHP admin you have click JM is a database click create now your database
9:22
has been created jsms you don't need to create the table these all things you have done by the larable migration form
9:31
okay now we have done now what I'm after create the database we have to give the
9:37
name of your database what the name JMS after that file save that's the
9:43
thing you have that's the only thing you have to do it that's it that's thing you
9:49
have okay so after done the database configuration after that what I'm going
9:55
to do is uh I'm going to run the project so how to run the project in you can see
10:02
terminal you have to file save you have to write terminal new terminal window
10:08
I'm going to run the project PHP
10:15
Artisan it's running now let's copy this path or you
10:20
can click on this you can select the follow
10:26
link okay if you click on the follow link it defaultly select the server and running so this is not error this this
10:33
has to migrate the uh our tables okay so it's not error it's defaultly it's come
10:39
as here it has to migrate this not error so you have to click on this I'm going to use
10:45
PHP Artisan migrate this is not there okay
10:52
it's everything is migrated now it's already project is running now let's check it
11:01
now it's work okay now it's work this is your uh
11:08
L 12 UI Design This is L 12 UI design simple okay I hope you guys you
11:15
understood the flow correctly right okay now what I'm going
11:21
to have that you have to go to the migration part you do the migration part so
11:28
migration which nothing but create the tables okay how to create the data
11:33
tables we are using the migration part okay if you want to create more tables
11:39
you are using uh type by the migration command what are the tables you have to
11:44
uh create on your database based on the table names you have to create as a migration part I
11:51
need a employee table employees here you can use the floral letter which is employees but a you use everything as a
12:00
plural letter okay so now what I'm going to do I'm going to over here I'm going to
12:05
create the migration so you have write it here I'm going to create this one migration Comm you type it this one copy
12:12
this migration let's type it so you can EAS understand how create how to type how to
12:18
create the tabl here using migration comp okay this is the project running so here we have to migration command this
12:25
so let's type it so how to type it type on it here you have to the window you
12:31
have to arrange it now I'm going to type
12:37
it PHP artisan
12:43
make colon Migra
12:51
migration migration okay create
12:59
underscore what is the table I'm going to create T employees you have to use with the
13:05
plural letter not singular plur employees
13:15
get okay PHP artisan make migration
13:21
create employees table okay whatever table you can write it using with the S
13:28
letter okay whatever table you are going to create end of end with the S letter
13:33
because a plural press enter key you migration you done the
13:39
migration you can after create this migration file you can uh check with the
13:45
database folder inside the database folder there is a migration folder is there uh inside the migration folder
13:52
there is a file as been created which is a create employee this one this file I'm
13:58
going to specify The Columns so what are the columns we have to put it over here
14:04
over here so here first what I'm going I need a uh these are the columns so I'm going
14:11
to go to here this one these are the columns so how to create the columns table string string
14:18
mean data type which is a string okay okay if it is a number there you
14:24
can write it as a integer okay uh integer here you can write it here if it is a uh phone number I don't need to
14:32
create any uh validation part I am going to Simply you have to keep maintain as
14:37
string do dat of birth you have to write it as a date for okay so this is this
14:44
how you have to put the data data types so yeah just copy this data type
14:49
okay so just copy it paste so here table how to how to type it write
14:57
here uh if you want to practice you have type table you have type like this
15:06
table string right employee write like
15:15
emplo likewise you have to type it okay you type likewise okay if you want to
15:21
write Mt type the integer you type just simply go to the
15:29
Google and type uh your right table
15:34
integer here integer L we are telling how to type the integer
15:43
and this is schema build here say increment
15:48
ID uh the the the string mean here you include the string everything should be
15:53
there here the big ring remand Boolean CH decimal how to type the decimal flot
16:00
integer how to type the integer everything should be there you can go and have it okay you can go and have it
16:06
everything okay this one you can you can write it like this okay so you can find
16:11
out this one everything okay this you go through this uh go over here and you can
16:17
find it okay you can learn okay so I no need to explain so
16:23
you have to learn okay quickly can learn that's it this a time stamp
16:29
after this this one should be automatically the the column should be there defaultly
16:36
uh when you save the record what time what time stamp what time you have uh
16:41
save the record and everything the time information and dat information should be there okay you can you can easily
16:49
capture that's the thing let's save
16:55
all let save all now what I'm going to do is I'm going to run the project
17:01
PHP uh PHP Artisan
17:09
migr now here your table has been migrated successfully you can see the
17:14
table has been migrated successfully create employee so the table has been migrated successfully now let's you can
17:21
check it uh table is migrated or not you can go over here you can check it
17:30
structure here after you ran the migration command uh here the following
17:36
column has been migrated successfully here the the newly you have created the employees
17:41
table here employee name do for they field should be there okay you can see create update is
17:50
coming from this this time I hope you you have you have a
17:56
clear understand and understand understand of how to create the migration
18:03
part after done the after done the uh
18:08
migration part now let's moving into the controller section okay controller you will be able
18:15
to see the app for inside the app for HTP controll is there here we I'm going to create the controller so how to
18:21
create the controller you have to Here There is a controller we have to create the controller I'm going to create the
18:27
controller but the resource controller what's the meaning by resource controller it will be managed the all
18:33
the cred oper operations okay One controller which manage the cred operation uh create update read and
18:41
delete it stand for create the cred transfer create
18:48
read update delete okay okay
18:54
CR u d okay credit operation Okay so here I'm going to get do do the thing is
19:03
this okay so how to create the controller resource controller so you
19:09
simple type PHP par make controller the controller name and resource resource
19:14
mean it will Implement all the cred uh operation stuff without uh typing the
19:20
cred operation function and all it automatically generated if you use this function which is a resource function
19:27
okay so now how to type this one here here you in the Lal standard you have use the employee not
19:33
employees okay so there is a some mechanism they are implemented when you create the
19:41
migration part you have to use the plural when you when you create the migration tables creation you have to
19:48
use the plural letter uh when you create the control stuff you have to use the
19:53
singular okay employee so I type them PHP
20:03
Artisan Artisan controller let's check each B make colon
20:14
controller okay you have to type like this okay this but what I type the same manner you have to type it okay sorry
20:22
don't type this controller after that we have to specify
20:28
the name of the controller after the resources I'm going toate the create name
20:35
employee after the controller this is we have to mention it
20:40
as resource if you not mention as resource
20:48
it will be created as a ordinary controller you have to mention this controller as uh this this controller is
20:54
resource controller PR Enter key the controller has been created as a resource
21:00
controller here this controller as a resource controller if you click on this controller this controller can by uh the
21:06
controllers consist of index create so store show edit update destroy all the
21:13
cred uh based on the cred operation function is there you can look at all the cred
21:22
related stuff okay now what I'm going to do is I'm going to uh do the thing is so
21:28
all the things are there okay after that what I'm going to do this I have created the controller controller so after that
21:36
I'm going to go to create the model okay after that we have to after create the model we have to come into the
21:42
controller okay so here how to create the model you have to create the model you have to use PHP add and make model
21:49
employee okay so what's the model model of part where communicate with the database and get the data F the data and
21:59
give to the passing to the controller controller will be passing to the view okay when the when the data
22:06
request when the data is request to the controller controller pass to the request to the model model get the data
22:13
from the database and send the response to the controller okay so I'm going to create
22:20
the model PHP Aran
22:31
make model
22:37
employee now the employee model has been created employee model has been created
22:43
OKAY employe model has been created now can you have to specify the this this is
22:49
the database schema you have to specify the database schema this is must okay so the what the schema mean what's the
22:56
table your database table what table it's nothing but the database configuration so here what's the table
23:02
employees the table the primary key should be ID okay if you have any
23:08
confusion you have go to the structure you can find out which is the primary key here that there is a key you can see
23:14
the ID there's a key this you can easily can find it here find out primary so you
23:19
can write primary key which is ID Protect fillable this are fillable columns employee name do fonts the
23:25
fillable column okay fillable column okay so you can see the rest of the column employee name d phone okay these
23:32
are the columns are there this is called as a fill LEL colum you will be able to see okay so these are the code simple
23:39
code I just code snipp I just copy it okay I just copy this columns paste
23:48
on it over here you can see the pro table name
23:53
employees primary key the fillable column these are the pr columns employee name d and phone
24:02
pH I hope you have understand so far well okay
24:08
file fa file save that's
24:13
it file s that's it that's the thing you have write it okay that's how we have
24:18
write it okay after that we have to create the view part okay now we have to create the
24:26
view part okay so View part this is a form creation we have do the form
24:31
Creations okay so now what I'm going to do is I'm going to go to
24:38
my the view all the view part we manage by here the the controller we are
24:45
managed by controll and model app folder and uh the database migration we have to
24:53
manage by the database folder and resources sorry the resources
24:59
which you manag by the views architecture so inside the resources there will be the folder called folder
25:05
name views for the views folder what I'm going the view folder I'm what I'm going to do is I'm inside the view folder
25:12
create the folder which is the layout folder inside the view folder I'm going to create a folder which is a layout
25:20
folder layout folder this layout folder what I'm going to do is the
25:27
layout folder the layout folder inside the layout folder create the file app. blade.
25:34
PHP app.
25:41
dot play.
25:49
pH okay this file you can have a simple uh HTML file so here this is same
25:58
this is template file so how to in vs Cod you type all on the shift key downlo press one key you to implement this one
26:04
this is a simple HTML structure you can see here this one you have write Lal
26:09
cred Lal cred I'm going to title I to make it as
26:16
here I have to inside that tack you have to implement the uh
26:21
bootstrap bootstrap
26:28
you type the link this one link ped on it over here inside this head tag after
26:34
that inside the tag I have to implement the links inside the body I have to implement this one as well uh script the
26:40
script click on this implement the script okay the script mean this is the
26:47
you have to uh the response every responsive in the uh LEL you have to
26:54
import this one as well script this is the boot style inside the body this is a
26:59
template file this is template each and every Pages the template should be display okay this this so that in LEL
27:07
you have to implement another one it's called as go the
27:13
documentation healed the healed okay healed contain
27:20
this is must but this heal contain mean the the template the template not be
27:27
different the same template only the content should be different each every
27:32
Pages the compl content should be different example if it is hom Pages this a homepage content should be
27:39
displayed if about us the it is a different uh pages will be display of
27:47
the about us okay the whats links you have create click it according to the
27:54
page page content will be different if you click if you go if you click uh
28:00
contact link the page display based on the contact information if you click
28:06
about link the link the page display uh the
28:11
page display according to the about of details if you click
28:16
service the page display according to the service information okay so that
28:23
those how it's work okay understand the flow how the flow is okay there let's
28:30
save all okay after that what you're going to do
28:37
is we have a create the uh layout page
28:42
successfully after that what I'm going to do is I'm going to go to to create the
28:48
pages so I'm going to create the pages and all so here we ask the
28:58
so now you I'm going to create the pages which is a uh inside the inside the file you P this called okay well after that
29:05
I'm going to create this these are the pages index. blade. PHP page and edit. blade. PHP so here inside the views
29:13
folder I'm going to create this a layout folder here I'm going to click the views folder you have to carefully you have to
29:19
watch views folder here right first one index. blade. PHP
29:28
so the there are so many student having a doubt why we are using
29:33
the extension blade. PHP in Lal you have to use blade. PHP okay so don't type
29:40
only PHP it won't work okay in laral if you are elected the Frameworks as Lal
29:47
you have to go along with the blade without blade it won't support okay you
29:53
can't run the project okay L does not support you you can not use blade okay
30:00
so you have to use along with the blade index. blade. pH this is the extension
30:06
along with blade okay this is not pure PHP this is a l okay so we have to
30:13
change according to the framework okay so here after you write edit. blade.
30:22
PHP okay so you have to use it edit. blank blade. PHP
30:28
okay so the index page so the index page okay so we have
30:36
to use extends and sections okay there are two
30:42
different things what is extends and sections okay first you have
30:47
to use extends
30:53
extends you have to define the layouts
30:59
okay you have to type it layouts layouts so this layout file
31:06
should be display this playouts you don't need to type this HTML and
31:11
everything this all things are coming if you have you have to type this folder name
31:16
correctly it is coming to the page so after that this page we have a yield content this
31:22
content we have to provide here so you have write it over there is a annotation
31:28
with the section you have write
31:35
cont section c okay understood
31:43
C after that this content you have write the you have write another this section
31:50
is open here you have to end section end section
32:08
okay so what I'm going to is here the simple things okay have is a simple form
32:15
design so this form design if you want to go to the good stab you have to type
32:25
form here this there are the several form designs are there okay the based on the form design
32:32
I have design okay so here I have to this one I already designed the
32:41
form you get the copy and everything here okay you can copy from my website don't worry table and formul okay so
32:49
don't worry about it you just copy this one okay the simple bootstrap design okay so I'm not here okay so the T
32:56
simple bootstrap format command design so here first you have to start with the
33:02
container container give and close it I'll be explain don't
33:08
worry don't this okay so after that what I'm going to do is here you can see
33:14
here you have write the Ed employee management you have to use the H3 tag
33:22
class the text Center we have to need to display the text as a center scen
33:29
okay so Center screen mean you can look at this one this design this a Design Center
33:34
screen okay after that we have to empty have size Prov the size and text primary
33:40
mean we have to give the color as this color you have to write the color text
33:47
primary it will be this okay the simple we can uh styling the bootstrap as well
33:55
okay there there is a in bootstrap latest version they providing the some
34:00
Advanced CSS styling okay if you learn The Styling well you can done the your
34:08
uh website using bootstrap okay so here after that you can see the another one is a justify contain row you can justify
34:16
contain Center Center mean the form has been center of the
34:22
scen okay so you have to draw you have write over here after that we have to I
34:28
need a only call md8 call MD it the
34:34
call it call it consist of 12 okay I I need a
34:40
size I know need to get the full full size file full size will be 12 I don't
34:46
need to get the full size of the form I need to display uh eight enough in my project I
34:55
I have three Fields Okay so I need a simple form design so it should be
35:00
enough so after that we have to make the card card Shadow LG means a large okay
35:09
card card mean is a card the card section you can write the Border we have to call as a card section
35:16
okay so the card section we have to write a shadow shadow large means the shadow
35:22
here around the card you can see the large Shadow you can see the
35:28
you can see the you'll be able to see the large Shadow this the thing I explain after
35:34
inside the card we have a card body inside the card body we have a write the
35:39
this heading H1 card title so the text should be
35:45
Center register employee the register employee it has been center after the
35:51
simple form design you make the simple form design over here after that here you can see the form you write the form
35:58
open and close it here c csrf means a token okay this talk
36:05
without the token it won't work okay you have to implement the token whether whether you Ser the save the record your
36:12
one is so the third party one the each each and every time you have to send the
36:18
form request it will be check the token CRF token why implement the CV token for
36:25
the security purpose larable uh larable uh Implement for the security
36:32
purpose they are implemented as default as a when the for when you submitting the form they implement the feature
36:38
called CRF token okay this nothing but the security
36:46
purpose okay after that we have form consist of the fields employee name do
36:52
and phone these are the three Fields okay the input field employee name do
36:57
which is which is a date format uh phone number which is a text
37:02
phone number it consists of one button which is a register button when you click the register button it goes to the
37:10
route employee controller store action method okay this is the simple form
37:17
design after that we have a another one is after that we have another one is a responsive table what is a table table
37:25
also we have write the Border there is a simple Hoover design the table Hoover h mean what it is nothing
37:32
but when you move the cursor on that table the color would be different okay
37:38
some of the animation will be happen what the some of the animation will be played from the
37:45
JavaScript they they implemented some some uh they are implementing some words
37:53
like this Shadow SM like this okay you have go through the lot of documentation
37:58
you can gain lot of new ones okay so that you can see the table table
38:04
border table who Shadow the table the shadow also
38:10
apply okay the table also we have apply the shadow as well okay the text center
38:17
after the these are the adding we have implement the heading we have put the heading this are theing employee name do
38:24
phone number and action okay these are okay after that the adding mean is the
38:32
set employee name dop phone number Antion okay after that we have t body T
38:39
body uh start it over here close it over here inside the T body we have a we have a uh we have
38:48
retrieve the data from the database and passing to the table okay pass to the table so these
38:55
are the table uh adding employee name do phone number and action okay these things we have uh explain later don't
39:04
worry okay now what I'm going to do is we have
39:10
done the uh views part successfully now let's go back to my controller
39:19
section go to the app HTP employee controller you go to the controller
39:25
section controller section first what you going to do is here I'm going to uh
39:30
link the model where your model is decided my model decided app folder models your employee model which is
39:39
my path so we have specify the path of the model okay we have to specify the
39:45
path of the mod here you have to implement like this use app write like this use app models
39:54
employee after that what I'm going do this we have write this prodct employees based on the project you have
40:01
to implement this one this on the employee Cent application you have to create the variable employee which is
40:06
the ex specified protect okay after that I'm going to create a simple
40:16
function public function construct you have write employee that this part we
40:22
have to we write new we have create the object we have to create the object okay here you have to create the object uh
40:28
using the new keyword this all the path the the all this employee schema you
40:35
have to create as object using the new keyword it is passing to this employee object okay so you have to call this
40:43
one okay after that the index page what index page does when the page is
40:50
loaded all the employee related uh data should be pass s into
40:58
this index method it will be passing to the view what are the employees details
41:03
available you'll be able to see the table okay so here you have to get the
41:09
response here simply okay I just copy and paste it you have to type on this one how to type the
41:17
response employees you have write employees this this mean this this
41:22
object you have call this all mean you have get all the dat from the database
41:30
about employees you have to get the all the data you have use all mean this all keyword you have to fetch all the data
41:36
from the from about employees and passing as a
41:43
response response and it will be passing to the view
41:49
page passing to the which page view page it pass into the view page that's the
41:55
thing it it pass into the page so that here we know need this
42:03
Pages we simply you type this one
42:10
uh this one you type this pages are there you write simply here your pages
42:16
mean this is the meaningful name which is a Pages mean there is a view folder
42:22
inside the view folder layout folder here the view folder what I'm going I'm going to create the new folder which is
42:28
the pages so these are the two different pages are there these both Pages all the
42:34
select and move move inside this Pages folder it then here you can see there is
42:42
a two folder inside the view folder one is a layout folder inside the layout folder there there is a file which is
42:48
app.php another folder which is a Pages folder the pages folder consist of these
42:54
two different files index files and edit files
43:00
okay you can see this these two files okay now when you go and load it you
43:06
have type Pages Pages mean the pages this is nothing but Pages folder
43:13
index index mean it will be getting this open up this PCH okay this getting all the data
43:21
loaded and passing to this response as this response goes to which page
43:28
Pages folder index page this page they retrieving the information as employees
43:34
this is this one match by
43:39
this then it work it won't the same name okay the
43:47
same okay we understand this okay after that what I'm going to
43:55
do is I know need to cre we don't have a button we have a store method store
44:00
method we have a another one is a you can see
44:05
the store function so this employee create when you create the new record
44:11
there is a method in our larable om tool which is a create method okay create
44:17
method request all and you have to get this one I'll be explain don't worry okay so
44:25
the employee employee the object you have to call this this is the part object you
44:32
have created the object over here this object you have to pass simply pass it over here here after that
44:39
edit I'm going to edit
44:45
the select this one here also select this one pass it over here
44:52
response as employee you have write over here the find here page edit the pages folder so
45:03
edit I be explain don't worry after that update copy it update don't worry this
45:11
one I'll be explained after that delete we have a
45:19
delete that's it don't worry I'll be explain this this
45:24
okay if I return return and explain take is it take about more than 2 hours to
45:29
complete this project that's why I just copy and paste it don't worry I'll be explain you have to take care of it what
45:35
I this okay this we just faced on everything okay so nothing to do it okay
45:41
so that's the thing you have right okay so the thing is nothing to it so let's save all okay now what I did here is
45:47
this is the our controller section we have complete our controller section uh index section we have complet the IND
45:55
section after that we have to go to the routes okay routes where we have get the
46:00
routes you can see the routes
46:06
section there is separate folder routes web.php here what I'm going to do is you
46:12
have to go to the routes so you have write the routes over
46:17
here this the routes fold you copy this and past it over here after that you
46:23
have mention the path of the controller section okay so here what I did here is Route
46:31
resources resource slash employee employee controller
46:37
class so what I did the default it is coming rout AS Slash
46:43
the Lal welcome screen has been display when you type Lal resources SL employee
46:50
it sces to the you have specify the path where your controller resided okay the
46:55
control is the one who manage everything it can manage entire project the control
47:01
is a part who can manage who can manage everything of the
47:06
project so the controller is very important part so we have to giving the part where your controller decide my
47:11
controller deide inside the app folder there is inside the app folder there is a folder which is HTTP okay HTTP controller folder inside
47:20
the controller folder our employee controller is there okay so if if the
47:25
request is coming cash employee you have to mention employee control this go over
47:30
here this particular path this particular path it open up and first of
47:37
all it display this index method because index method is the first method over
47:45
here or this method should be displayed okay what happen this display what I did here is it f the data from the
47:53
database okay so this course we already we have link the my link the path of the
48:00
database schema which is you can already here you can give the object you cre already yet employee all mean it get
48:07
the it go to the model and it's check with the model where the employees there if the employees there the why this
48:15
model it will be communicate with the database and lo the Lo the information
48:21
about the employee and send it back to my index method here after that this all
48:28
the data should be loaded into the pages Pages folder index action okay
48:35
that's the thing it will be happen so let's file and save all now let's back to
48:41
here uh let's back over here so where's my project dis Pro this all things I
48:47
just copy this URL paste it over here this is my LEL
48:53
homepage okay so this L page now let's slash you type
49:00
employee uh here there error should be this way view slay outs not found so
49:07
where you can do it here if you get error you go to
49:14
your views resources folder views here index page Index P first
49:21
folder layouts you have check with the name whether it's correct or not lay
49:27
L outs layouts so what
49:36
there VI layouts not found I think the error
49:45
layouts so let's rename this one copy this and past
49:50
it over here now let's file save all something the name should be
49:58
different again the
50:05
problem layouts why there a problem let check
50:18
out ah okay okay the layouts here here what I did here is
50:24
simply I didn't specify the name layout. tab here the layout folder I specify
50:31
inside the layout folder there is a for file which is app okay if you like
50:36
layout. app then only the folder inside the folder we have a template is there
50:42
okay you don't need to type everything only type this first two things on these are the extension we don't need to type
50:48
the extension only the type name of the file is app only okay you have type and
50:54
uh type you have type it so let's save all and bring to the application and check
51:00
it now it's work okay now here this is the simple
51:06
template you'll be able to see the simple template has been display it looks nice so here write it
51:14
here I'm going to type Raja
51:19
DS fourth phone number something you have to type it click register it it has
51:26
been registered here you can see here you can see here simple highlight here this is the
51:32
styling when you move the cursor on the table the the color would Chang so here
51:39
simple very nice coloring coloring stuff you'll be able to see this is the thing
51:45
I have expected expected this this is the
51:51
things I expected okay the design design is very diff uh good okay
51:58
here okay so now you have a idea so the the Index P so what I did here is what
52:06
happen is Pages index page is retrieving all the data and response mean it's get the
52:12
data and passing to here it passing the name employees as a key and here employee
52:19
here you it's coming as a plural it getting the data one by one which is singular employee there employee name
52:27
employee dop employee phone number these are the fields is there in the database you can see
52:33
here employee name do form okay what are the employee names should be there it
52:39
will be passing here okay the r everything should be passing to here
52:46
after that we have a two different buttons edit and delete okay delete when
52:52
you edit the de code what happen is you have to get the ID of the table why we
53:00
get the ID and edit and delete the record ID is a primary key because the primary ke is a unique key this is the
53:07
unique identification okay there are the one employee has a several names that if
53:12
if you look at the Raj the the r which name only should available one person no
53:19
there are multiple person having the same name so the ID not uh not like that
53:25
okay each employee has different ID unique ID okay so that we have to edit or delete the record we
53:32
have to done both operation using the
53:37
unique ID okay the unique identification so that you have write
53:43
employee this employee you have to create the employee uh you can see the an an anchor link anchor this is the
53:51
anchor anchor Point okay the links okay the links we have a the links we have
53:57
generate the buttons here you can see here simple button the class BTN small buttons we have to implement the small
54:03
buttons so okay so after that it it will be if you click on this edit link it
54:10
will be passing to the different links different page which is a edit page so
54:15
you have edit page is there edit page so what I'm do is the edit page also this code should be have a in the code after
54:22
index page index. blade. pH page you have edit PHP so what I did here is the same link
54:31
I just copy it and paste it over here I know need to explain I I hope because
54:36
extend what is the meaning of extend what the section everything I already explained when I uh when I come when I
54:44
did the index.php the inside the section we have a
54:50
container so here here we have a eding employee eding so when you click edit
54:55
button there is a form this form this is simple just I put it the one form okay
55:01
this form there is no table so only the simple form okay when you click edit button what happen is uh the editable
55:08
data should be passing to the this for okay okay so here let's
55:17
see okay this one I'm going to explain later on okay now let's see you can see
55:26
you can see the databas displ so here I'm going to do how to add add the record you can see I'm going to this
55:33
record as a an date of birth uh you can see the date
55:41
of
55:48
birth something so number so if you click at register
55:56
button what Happ is what I did here is this is the form you have filled all
56:01
the data click register button it goes to the route employee employee
56:07
controller store action method okay so this route is go VI like
56:12
this here here if you implement the resource controller it take care of it
56:18
this is goes to the it is it it is goes to the store action method so it goes to
56:24
the store action goes find the store action method retrieve all the data of the
56:30
employees okay store employees okay the employees if you click the store action
56:35
goes to the store action here store action we already give this store action
56:45
method retri all the data retri all the
56:51
data all the data and here we we have already we have a model schema employee
56:58
we have a function create get all retrieve all the data and create the record and re redirect to the phone
57:05
back okay that's the thing you store meod okay after that edit what the meaning by
57:14
edit now here edit if you click the edit button here editable record will be passing to the respective form editable
57:21
date record will be passing the respective form okay so the click edit button what happen is I'll
57:28
be what happen is you can click over here if you click edit button it goes to the form
57:37
which is edit form edit form employe this this employee edit
57:42
form along with the ID so what happen is go to the function edit along with the
57:50
ID this is it is it is finding there is a om tool there is a method called
57:55
finding okay find the employee object this employee object employee find me it goes to the
58:03
table and searching which is which record is this
58:09
ID is match with which record but the ID is two is matched this respective record
58:14
will be display onto the phone okay so this record is the ID is coming
58:21
one the person is Raj the matching record this Raj okay that get the
58:28
response this employees employee has a response this one employee this one
58:33
employee it's not employees okay one employee response it redirect to the
58:39
page edit page as a response and get the record okay get get the information the
58:44
employee it passing the employee name employee do employee phone number only
58:49
one person okay so that why I put it a one okay if you click edit this person is no
58:56
it goes to that okay that when you click that particular account it get the that
59:01
person and get and you have to write the attribute value inside if you write the
59:08
attribute value inside this form text box the data
59:13
will be passed that's the thing after that get the de code after
59:19
if you make any changes click update button it goes to the employee controller update action
59:24
method here here what happen is both here you can see there is a two parameters one is the
59:31
all the record information plus side okay so the it will finding the what the
59:37
record you are going to change it find the ID after that we have a request data
59:45
after that you have update you have write the update you write the there there method called update array match
59:53
okay array match this is the employee this employee to array this you have get the record as array request is all the
1:00:01
request okay passing to this array it will be updated okay that's how we have did it
1:00:08
okay that's after redirect to the employee
1:00:13
page okay I hope you guys understood things well okay so let's do the things
1:00:19
I know press another D it will be updated okay after that we have another
1:00:28
field which is a delete if you click delete button record has been deleted what happen is in delete button delete
1:00:36
action we don't need to worry about this one we don't need to pass into the another form and all the same form we
1:00:42
can delete it so here the same form here we have put the form action the delete
1:00:48
button when you click delete button it goes to the route employee destroy you
1:00:54
have to call the employee destroy what happen employee destroy along with the ID so it's go to
1:00:59
the employee destroy say employee destroy employee controller destroy
1:01:04
action method get the ID what the ID is coming over here get the ID and after
1:01:11
that we are calling employee delete mean that this
1:01:17
this is the OM delete function which which which is what the uh ID is coming
1:01:24
coming uh coming coming to the function the find function the particular record has
1:01:30
beened that's that's the thing we have I hope you
1:01:35
guys I hope you guys you understood the scenario well if you have any doubt you
1:01:41
can let me know that I hope this is a clear explain of the uh fraud operation
1:01:47
of larel 12 congratulation we have to make this cred application step by step thank you for
#Programming
#Computer Education