Up next in 10

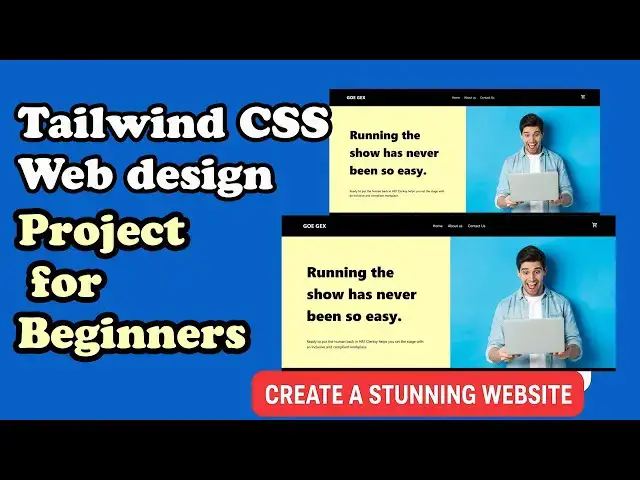
🚀 Welcome to this Tailwind CSS tutorial for beginners! In this step-by-step guide, we’ll build a Tailwind CSS project from scratch and create a Tailwind CSS website that is modern, clean, and fully responsive.
In this video, you’ll learn:
✅ How to set up Tailwind CSS quickly
✅ Basics of Tailwind CSS web design
✅ Building a complete responsive web design Tailwind CSS project
✅ Tips for creating professional web design with Tailwind
Whether you’re just starting out or looking to improve your skills, this tutorial will help you master Tailwind CSS web design and create beautiful websites with ease. By the end, you’ll have a fully working Tailwind CSS website project you can use as a portfolio example.
👉 Don’t forget to like 👍, subscribe 🔔, and share this tutorial to help more people learn Tailwind CSS!
#TailwindCSS #tailwindcsstutorialforbeginners #ResponsiveDesign,
#tailwindcssproject #tailwindproject
Show More Show Less View Video Transcript
0:01
Hi friends, welcome to tutors funny
0:03
channel. Today I'm going to teach how to
0:04
create this kind of a landing pages
0:07
using tailwind CSS. Okay. Right. Now I'm
0:11
going to the same for this folder. I'm
0:12
going to create another page. So I'm
0:14
going to name it as this one example
0:17
one. You can name whatever name. So this
0:19
is sample page. Okay. So I'm going to
0:21
create it here in VS code editor. Hold
0:23
on the control key down and press. Sorry
0:26
shift key down and press one. you can
0:28
get this mark and import the HTML and
0:30
CSS. Right after that, I'm going to go
0:34
to the tailwind CSS. So, go to the
0:37
Google
0:39
uh and type tail.
0:42
So, we have to go to the that library,
0:44
right? So, the tailwind is very simple
0:47
part. There are many student aware about
0:49
what is tailwind is too hard and
0:51
everything. It's very simple.
0:54
Okay. So, click on it.
0:59
First you have to implement the docs.
1:03
Okay. So you have to implement the docs
1:04
for the docs. You have to add the
1:06
library. If you are not at the library,
1:09
we cannot use the table. So the play CDN
1:13
go along with the play CDN. Copy this
1:16
style.
1:18
Just control Copy.
1:21
Put into over here. That's it. The style
1:24
has been added. Right after that, I'm
1:27
going to go to do another couple of
1:29
things. I'm going to go to the Google
1:31
font.
1:40
Click on it.
1:48
Nto
1:51
saxs this font. I need this one. So
1:54
click on it.
1:57
How to get them?
1:59
So uh this is the fonts. Okay. So get
2:02
the font. Get font. So get the embed
2:05
code. I need embed code. This is the
2:07
font style. You have to include the
2:10
here. You can see what the instruction
2:11
they have given. So click on it. Then
2:14
copy this one. Okay. this one you can
2:17
put it inside the inside the art tag
2:20
then only you will be able to use the
2:22
Google forms right simple
2:26
okay right so now all all things are
2:29
completed successfully right now what
2:32
I'm going to do is I'm going to go to do
2:34
the
2:36
tailwind CSS where we do every every
2:38
styles and all right so first what what
2:40
I'm going to do is I need that this
2:44
background
2:45
Look, I need a black. So if you have any
2:48
problem tailwinds, you go to the
2:51
documentation. You can go to the
2:53
official documentation of tailwinds.
2:55
They explain very well.
3:00
Okay? Rather than you have to confuse,
3:04
you go to the official document
3:07
documents. Okay. This is a documents do
3:08
talks. You can go to the docs. You can
3:10
get everything
3:12
any doubts regarding the this one every
3:16
things are there colors and everything
3:18
are there. So here how to implement the
3:21
colors and everything you can. What is
3:24
the trail? This is the CSS we have to
3:26
short form of tail very CSS. Okay. So
3:29
now what I'm going I need a background
3:32
color. So you have right here you have
3:33
to type it background color.
3:38
Background
3:42
color
3:45
here BG stand for BG here background
3:48
color we have to start for BG a
3:51
background color BG white so I need a BG
3:54
you can write BG red everything BG red
3:57
oh this is the called as a light it's a
4:01
small light after that 90 mean it is a b
4:05
okay so what I'm going to say simple You
4:08
have to write this one. I'm going to go
4:10
to our tailwind body. I'm going first
4:12
one I'm going to set as a BG color.
4:15
Okay. BG color. What the BG color? How
4:17
to set the BG color? BG
4:21
black.
4:24
That's it. After that what I'm going to
4:26
do is BG color set successfully. I want
4:30
to first set as a margin zero. Your
4:32
start the short form of F0
4:36
and P 0 mean margin zero. It stand for
4:38
margin zero padding zero simply.
4:42
Okay. So that it it nothing but like
4:44
that margin
4:48
zero
4:50
padding zero.
4:54
Okay. Okay. It's nothing but like that.
4:57
Okay. So we have write as simply short
5:00
form of like that. Okay. Simple. After
5:02
that we have to write the contents.
5:07
Okay. Here are three here. Here we have
5:10
to implement the three dues.
5:12
So you have to write two
5:15
three. Press enter key. You have to
5:18
divide that into three. After that this
5:22
one for logo.
5:25
Okay. For logo. So you have to write
5:27
class. you have to write uh we have to
5:30
write a logo here. So here here we no
5:34
need to style. So it's everything you
5:36
have to style it. Okay. So here what I'm
5:37
going to see again uh this a main view
5:42
simple three. So we have to write a main
5:44
view as
5:46
the div we have to style it. Okay. D1
5:48
just start it here. submit. Okay, submit
5:54
this view what I'm going to say I'm
5:56
going to uh what I'm going to do is I'm
5:58
going to uh class you have to write the
6:01
class what how to implement that uh
6:03
flexbox in flexbox
6:07
okay flax box I need flax
6:10
simply flax here write flax box I need a
6:14
justify content between
6:16
mean it is here it's like a between
6:20
okay in in You can see if you have not
6:23
studied flexbox you must study. Okay.
6:25
Between. So you have to justify simply
6:28
you have to justify between
6:30
after that I want to set as the
6:33
horizontal center. So you have to write
6:35
so vertical center. So you type item
6:37
simple items set.
6:41
Okay. After that we need to set the
6:43
padding and paddings. Okay. So top and
6:46
right paddings outside the paddics top
6:49
and left. Sounds set as simply you have
6:53
to px mean x
6:56
you have write select as 24
6:59
p y mean
7:01
horizontal padding you have to set it as
7:05
okay this is the this padding is nothing
7:07
but it's not not a fix or inches this is
7:10
the tailwind CSS margin okay you can uh
7:14
go to that if you have any doubts you
7:16
can go over here you can type it
7:18
paddings Here
7:21
how to set the padding they mention it
7:23
here P8. So here this is the size they
7:27
mention PP there are many there are
7:30
various padding there. You go along with
7:32
the documentation you will be able to
7:34
study more right. So after that you have
7:37
a text color. I need a text color. I
7:41
need a black.
7:44
So I need a black color. So that uh
7:46
black color that this a black color.
7:48
So the black color. So text color black.
7:51
So you no need to write black text
7:53
black. That's it.
7:56
That's a container. These are the
7:58
container.
8:00
Okay.
8:03
Okay. This is for this part for logo.
8:06
The logo. How to do the logo
8:09
class. So simply you write as logo. How
8:12
to write the logo? Simple class
8:17
text we have to
8:23
XML we have to size we have to increase
8:26
the size and we have to font we have to
8:28
select as a board
8:34
select as font.
8:38
Okay, another one we have to we already
8:42
we have to add the Google fonts. So you
8:44
have write the font I want to make as
8:47
font sense
8:48
the font sense we already add the
8:51
font sense I need a font sense okay
8:55
otherwise you have to you need this font
8:58
but I will get this one you have to
9:00
write this s okay n s you have right for
9:04
s
9:06
you write this one as
9:09
[Music]
9:11
your s you just keep chance It's okay.
9:15
Okay, that what is the font you have to
9:17
implement it. Okay, simple. So your logo
9:20
you have right logo you have right and
9:23
you name it as what's the logo
9:25
[Music]
9:27
this one
9:30
okay
9:33
control s and right click and open with
9:37
live server you can check it here this
9:40
successful it's displaying
9:42
displaying sat here you will be able to
9:44
see
9:46
displaying success
9:49
Okay,
9:50
displaying satis.
9:56
I have forget the classes.
9:59
The classes
10:02
that's why it's not display
10:05
style is not applied
10:11
s you have to put a class then it will
10:14
be applied. I go over here it's it's
10:18
okay background color this one it's uh
10:21
that uh background color this one with
10:23
this color we have to make it as white
10:26
that's why it's not showing now it's
10:28
okay
10:31
this foreground color is a background
10:32
color white okay the foreground also
10:35
black background color so black we can't
10:39
say see the fonts that's why we have to
10:41
we couldn't see the fonts after that
10:43
what you're going to do is Uh it's
10:45
another one you have to write it here.
10:47
Uh we have to make the link. So you have
10:50
to write
10:54
three. You have to write this home about
10:57
users.
11:07
So we make the links. So you have to
11:09
write class
11:12
flex
11:14
gap
11:16
six. This this is implement by the uh
11:21
tailwinds here. Simple. Okay. It's it's
11:26
working according to it. Very simple.
11:28
How do we need another one is to for our
11:31
icon we set the icon material icon. So
11:34
that uh material icon also we have write
11:36
a class as well. So what you going to do
11:39
is you have to icons right typing icon
11:41
sorry icon
11:47
icons everything icon is there so that
11:50
you have to get a Google icon also this
11:53
icon
11:55
this icon you get this here
11:58
uh
12:00
icon shopping cart
12:12
the shopping cart. Click on it
12:16
uh for web
12:19
uh this one should be material design.
12:21
So we have write the material we go
12:22
along with the material design. Before
12:23
that you can this one this style we have
12:26
to material just copy and paste on it
12:29
over here then it should work.
12:32
Okay, the icon should be up. But after
12:34
that, what you're going to do is
12:37
go to the material. It's a material.
12:39
Copy this material design. Copy it.
12:43
Paste on it over here. Okay. Right
12:46
click. Format document. Everything
12:49
successfully.
12:51
Back to my design. It's working
12:53
successfully. Perfect.
12:55
It's perfect. Perfect. The first part is
12:58
over.
13:03
Second one we have to do the second this
13:05
one this one it's simple second one is
13:08
very simple this one what you're going
13:10
to do is we have to do the another
13:12
simple part uh what how to implement the
13:15
second one we have to make the another
13:18
div tag okay the div tag
13:23
close it
13:25
okay so you have to this is the d go
13:28
along with the dflax Great grid we have
13:31
separate by the two. So grid grid
13:37
column calls two.
13:42
Okay. After that BG color
13:48
you have to write over here
13:52
this color.
14:04
text black.
14:14
After that div
14:18
class
14:20
flex
14:22
flex
14:25
called
14:30
justify content center
14:34
item center.
14:40
Okay. After that I'll be explain div
14:45
uh class we have to make it as a width
14:49
we have to make it as width as 70
14:53
uh percentage I'll tell you why this we
14:57
have to put it as 70%age
14:59
okay after that what I'm going to is we
15:01
have to uh do the uh things which is a
15:05
simple one so you have to write first
15:07
one you have to write the d first one is
15:10
H1 tag.
15:12
H1 tag. Another one is a paragraph tag.
15:18
Okay, this paragraph tag. This one
15:20
should be the you can copy this this
15:22
text over here.
15:26
This text you have to put it over here.
15:29
Let's check it out how it's working.
15:36
It's working like this. Okay. Now what
15:39
I'm going to do is what I'm going to do
15:42
is now we have to make the style. So
15:46
class
15:50
text we have to increase the size. So
15:53
text you have write the fourm
16:02
for sorry 4mm
16:07
[Music]
16:08
font extra board
16:21
and you have Write P by mean P by 10.
16:26
That's it.
16:28
After the paragraph
16:36
text
16:38
1 2 rem
16:45
by
16:47
4
16:55
successful
16:58
Okay, it's it's very attractive.
17:02
Okay, it's working successfully. It's a
17:04
very attractive look. Now you'll be able
17:06
to see very attractive.
17:08
So this one also you can write it as a
17:10
five.
17:13
Let's check it. So that also the
17:15
paragraph also you can make it as two.
17:22
Okay,
17:24
the paragraph simple. So that's why very
17:26
simple.
17:28
Now what I'm going this one should be
17:30
the font. We have to set this one also.
17:33
Font font
17:35
uh
17:38
regular
17:44
regular
17:49
fonts. No need. Okay. It's okay. After
17:52
that we need a image.
17:55
we need a image.
17:57
So after that what I'm going to do is we
17:59
have to uh we need an image.
18:04
So this one uh
18:09
we have a div tag
18:12
division tag image. So image is this
18:16
image we have to put it here. image
18:19
img src
18:24
SSD jpg
18:27
all text you write uh something you can
18:31
write it also
18:33
do text
18:36
uh laptop
18:39
save something
18:42
s to save but application is coming like
18:44
this so that's a simple way here it's
18:46
it's working over here. Why is a
18:48
problem? Small problem. Uh I score
18:53
there.
18:55
This is this is 70%age.
19:06
Okay. The problem is here. Go to
19:17
Now it's working. Okay, now it's working
19:19
successful what we expected.
19:23
Okay, what I did here is we have a this
19:26
one should be grid. Grid mean we have to
19:28
separate these two things. So that we
19:30
have how many grids we need two columns
19:33
two. So background color this a
19:35
background color you have to write this
19:36
background color nothing but this
19:38
background color. This is a background
19:39
color. This is the image color. Okay,
19:40
don't worry. So the text mean text black
19:43
mean all the text should be black. So
19:45
after that second div what I mention it
19:48
flax flex column justify content center
19:51
uh this one this one
19:56
this one justify content center align
19:58
contain center okay so justify contain
20:00
align content so what I'm doing is okay
20:03
justify content center after that div
20:06
class with 70 mean this width we set as
20:08
70
20:11
that's why it's coming like this okay so
20:13
70 is 70. So you have to write in in
20:17
between this division tag you have to
20:18
write between the 70 you have to write
20:20
the uh H1 mean this H1 tag uh text. Okay
20:24
this one we have to increase the font
20:26
size and extra board P 10 minute we have
20:29
to horizontal we have to add the margins
20:32
paddings. Okay this is not margin
20:34
padding padding Y. Okay. So the same
20:37
thing the
20:40
paragraph it's we have to increase the
20:42
font size so that here here we arrange
20:44
the padding this is the paragraph that's
20:46
it division is start close okay this is
20:49
the another div we have to we have to
20:52
implement the images that's it okay
20:54
that's how we have make this thank you
20:56
for watching