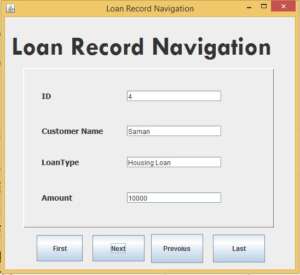
This tutorial will teach you how to make Record Navigation using Java Mysql.
First we have to Connect to Database create the method connect()
 public void connect()
    {
        try {
            Class.forName("com.mysql.jdbc.Driver");
            con = DriverManager.getConnection("jdbc:mysql://localhost/apocompany","root","");
            stat = con.createStatement(ResultSet.TYPE_SCROLL_SENSITIVE,ResultSet.CONCUR_READ_ONLY);

            rs = stat.executeQuery("select id,custname,loantype,amount from loan");


        } catch (ClassNotFoundException ex)
        {
           ex.printStackTrace();
        }
        catch (SQLException ex) {
           ex.printStackTrace();
        }
    }
after that call the method inside constructor of class i shown below.
 public LoanNav() {
        initComponents();
        connect();
    }
Create the First Button paste code inside the button
   try
        {

            rs.first();
            txtid.setText(rs.getString(1));
            txtname.setText(rs.getString(2));
            txtltype.setText(rs.getString(3));
            txtamount.setText(rs.getString(4));

        } catch (SQLException ex) {

        }
Create the Last Button paste code inside the button
try
        {

            if(!rs.isLast())
            {
                rs.next();
                txtid.setText(rs.getString(1));
                txtname.setText(rs.getString(2));
                txtltype.setText(rs.getString(3));
                txtamount.setText(rs.getString(4));
            }

        } catch (SQLException ex) {

        }
Create the Next Button paste code inside the button
        try
        {

            if(!rs.isLast())
            {
                rs.next();
                txtid.setText(rs.getString(1));
                txtname.setText(rs.getString(2));
                txtltype.setText(rs.getString(3));
                txtamount.setText(rs.getString(4));
            }

        } catch (SQLException ex) {

        }
Create the Previous Button paste code inside the button
  try
        {

            if(!rs.isFirst())
            {

                rs.previous();
                txtid.setText(rs.getString(1));
                txtname.setText(rs.getString(2));
                txtltype.setText(rs.getString(3));
                txtamount.setText(rs.getString(4));

            }

        } catch (SQLException ex) {

        }
I have attached the video tutorial below it will help you to do this step by step.