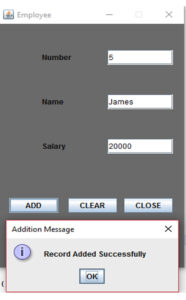
This tutorial will teach you GUI Application in java step by step. How to create the Button and Text Fields and Label writing by the code.
Source Code of the Project
import java.awt.*;
import java.awt.event.*;
import java.sql.*;
import javax.swing.*;

public class Empl extends Frame implements ActionListener {

JLabel l1,l2,l3;
JTextField t1,t2,t3;
JButton b1,b2,b3;
Connection con;
PreparedStatement ps;


public Empl()
{
super("Employee");
setSize(300,450);
setBackground(Color.gray);
setResizable(false);
Dimension screensize=Toolkit.getDefaultToolkit().getScreenSize();
Dimension windowsize= getSize();
this.setBounds((screensize.width - windowsize.width)/2, (screensize.height - windowsize.height)/2, windowsize.width,windowsize.height);
setLayout(null);

try
{
 Class.forName("com.mysql.jdbc.Driver");
 con = DriverManager.getConnection("jdbc:mysql://localhost/StudCruds", "root","");
}
catch(Exception e)
{
JOptionPane.showMessageDialog(null,e,"Error Message",JOptionPane.ERROR_MESSAGE);
}

l1=new JLabel("Number");
add(l1);
l1.setBounds(75,75,100,25);

l2=new JLabel("Name");
add(l2);
l2.setBounds(75,150,100,25);

l3=new JLabel("Salary");
add(l3);
l3.setBounds(75,225,100,25);

t1=new JTextField();
add(t1);
t1.setBounds(175,75,100,25);

t2=new JTextField();
add(t2);
t2.setBounds(175,150,100,25);

t3=new JTextField();
add(t3);
t3.setBounds(175,225,100,25);

b1=new JButton("ADD");
add(b1);
b1.setBounds(25,325,75,25);
b1.addActionListener(this);

b2=new JButton("CLEAR");
add(b2);
b2.setBounds(115,325,75,25);
b2.addActionListener(this);

b3=new JButton("CLOSE");
add(b3);
b3.setBounds(200,325,75,25);
b3.addActionListener(this);
}

public void actionPerformed(ActionEvent e)
{
if (e.getSource()==b1)
{
onAdd();
}
else if (e.getSource()==b2)
{
onClear();
}
else if (e.getSource()==b3)
{
onClose();
}
}

public void onAdd()
{
try
{
ps=con.prepareStatement("insert into personal (id,name,salary) values(?,?,?)");
ps.setString(1,t1.getText());
ps.setString(2,t2.getText());
double sal=Double.valueOf(t3.getText()).doubleValue();
ps.setDouble(3,sal);
ps.executeUpdate();
JOptionPane.showMessageDialog(null,"Record Added Successfully","Addition Message",JOptionPane.INFORMATION_MESSAGE);
}
catch(Exception e)
{
JOptionPane.showMessageDialog(null,e,"Error Message",JOptionPane.ERROR_MESSAGE);
}
}
public void onClear()
{
t1.setText("");
t2.setText("");
t3.setText("");
t1.requestFocus();
}

public void onClose()
{
hide();
}

public static void main(String args[])
{
Empl a1= new Empl();
a1.show();
}

}
i have attached the video link below. which will do this tutorials step by step.