This tutorials will teach Cab Services System using Java and Mysql step by step process. This project will help you to do the java assignment projects and java best practices.
Lets do the Project step by step
First Step Establish the database connection
import the sql namespace
import java.sql.*;
Create Prepare Statement object and Connection objects
Connection con;
PreparedStatement pst;
Create the Method Connect and inside the method add the connection
     public void Connect()
    {
        try {
            Class.forName("com.mysql.jdbc.Driver");
            con = DriverManager.getConnection("jdbc:mysql://localhost/gvccabs","root","");
        } catch (ClassNotFoundException ex) {
           ex.printStackTrace();
        } catch (SQLException ex) {
            ex.printStackTrace();
        }
    }
After that call the Connect Method inside the Constructor of class. When the Constructor is initialize get the call the
Connect method then Connection will be loaded.
public Journey() {
initComponents();
Connect();
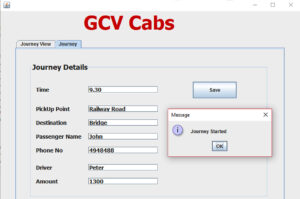
}Paste the Code inside the Save Button
    String time,point,des,pname,phone,driver,amount;

        time = txtTime.getText();
        point = txtPoint.getText();
        des = txtDes.getText();
        pname = txtPname.getText();
        phone = txtNo.getText();
        driver = txtDriver.getText();
        amount = txtAmount.getText();

        try {
            pst = con.prepareStatement("insert into records (time,pickup,Destination,pname,phoneno,driver,amount)values(?,?,?,?,?,?,?)");
            pst.setString(1,time);
            pst.setString(2,point);
            pst.setString(3,des);
            pst.setString(4,pname);
            pst.setString(5,phone);
            pst.setString(6,driver);
            pst.setString(7,amount);
            pst.executeUpdate();
            JOptionPane.showMessageDialog(this, "Journey Started");

            txtTime.setText("");
            txtPoint.setText("");
            txtDes.setText("");
            txtPname.setText("");
            txtNo.setText("");
            txtDriver.setText("");
            txtAmount.setText("");
            txtTime.requestFocus();

        } catch (SQLException ex) {
           ex.printStackTrace();
        }
View the Data to JTable
Create the method table() and load the data from the database.
public void table()
     {

         try {
            pst = con.prepareStatement("SELECT * FROM records");
            ResultSet Rs = pst.executeQuery();


            ResultSetMetaData RSMD = Rs.getMetaData();
            int CC = RSMD.getColumnCount();
            DefaultTableModel DFT = (DefaultTableModel) jTable1.getModel();
            DFT.setRowCount(0);

            while(Rs.next()){
                  Vector v2 = new Vector();
                for (int ii = 1; ii <= CC; ii++) {
                    v2.add(Rs.getString("id"));
                    v2.add(Rs.getString("time"));
                    v2.add(Rs.getString("pickup"));
                    v2.add(Rs.getString("Destination"));
                    v2.add(Rs.getString("pname"));
                    v2.add(Rs.getString("phoneno"));
                    v2.add(Rs.getString("driver"));
                    v2.add(Rs.getString("amount"));

                }
                DFT.addRow(v2);
            }

            jTable1.setModel(DFT);

        } catch (SQLException ex) {
            ex.printStackTrace();
        }
     }