This JDBC will teach you how to do basic database functions that are CREATE RETIEVE UPDATE and DELETE in IntelliJ IDEA using Mysql Database. IntelliJ IDEA is a very famous editor to writing the Java codes. The INSERT, SELECT, UPDATE and DELETE statements can be used in any database system, because this is support by all relational database systems.
We will learn how to INSERT, SELECT, UPDATE and DELETE in database by writing code to manage the products table in the database named rbcompany. employee table consist of following columns employee name,salary,mobile.
Feature of projects
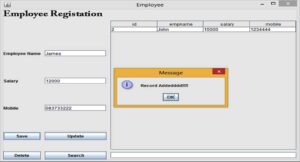
The system shall be able to record Employee details : employee name,salary,mobile.
The system shall be able to retrieve the Employee details : employee name,salary,mobile.
Then system shall be able to Edit and Delete the Employee details : employee name,salary,mobile..
Learn how to make this System Step by step
Step 1: Download JDK Click here follow the steps and install it. Step 2: Download an appropriate jdbc driver Click here in order to connect jdbc and mysql. Establish the database connection
 Connection con;
 PreparedStatement pst;

     public void connect()
     {
         try {
             Class.forName("com.mysql.jdbc.Driver");
             con = DriverManager.getConnection("jdbc:mysql://localhost/rbcompany", "root","");
             System.out.println("Successs");
         }
         catch (ClassNotFoundException ex)
         {
             ex.printStackTrace();

         }
         catch (SQLException ex)
         {
             ex.printStackTrace();
         }
     }
Add Records
you can use the following code snippet to add the records in to database. paste the code inside the save button.
  String empname,salary,mobile;
              empname = txtName.getText();
              salary = txtSalary.getText();
              mobile = txtMobile.getText();

                try {
                    pst = con.prepareStatement("insert into employee(empname,salary,mobile)values(?,?,?)");
                    pst.setString(1, empname);
                    pst.setString(2, salary);
                    pst.setString(3, mobile);
                    pst.executeUpdate();
                    JOptionPane.showMessageDialog(null, "Record Addedddd!!!!!");
                    table_load();
                    txtName.setText("");
                    txtSalary.setText("");
                    txtMobile.setText("");
                    txtName.requestFocus();
                }

                catch (SQLException e1)
                {

                    e1.printStackTrace();
                }

            }
View Records
you can use the following code snippet to view the records from the database. paste the code . create the function table_load() and paste the following code.
void table_load()
    {
        try
        {
            pst = con.prepareStatement("select * from products");
            ResultSet rs = pst.executeQuery();
            table_1.setModel(DbUtils.resultSetToTableModel(rs));
        }
        catch (SQLException e)
        {
            e.printStackTrace();
        }
    }
Search Records
Enter the Employee id on textfield relavent Employee information will be displayed on the relavent textfield.
     try {

            String empid = txtid.getText();

            pst = con.prepareStatement("select empname,salary,mobile from employee where id = ?");
            pst.setString(1, empid);
            ResultSet rs = pst.executeQuery();

            if(rs.next()==true)
               {
                 String empname = rs.getString(1);
                 String emsalary = rs.getString(2);
                 String emmobile = rs.getString(3);

                 txtName.setText(empname);
                 txtSalary.setText(emsalary);
                 txtMobile.setText(emmobile);

                 }
               else
                 {
                  txtName.setText("");
                  txtSalary.setText("");
                  txtMobile.setText("");
                  JOptionPane.showMessageDialog(null,"Invalid Employee No");

                }
                }
                catch (SQLException ex)
                {
                       ex.printStackTrace();
                }
            }
Edit
you can use the following code snippet to Edit the records.
String empid,empname,salary,mobile;
                empname = txtName.getText();
                salary = txtSalary.getText();
                mobile = txtMobile.getText();
                empid = txtid.getText();

      try {
            pst = con.prepareStatement("update employee set empname = ?,salary = ?,mobile = ? where id = ?");
            pst.setString(1, empname);
            pst.setString(2, salary);
            pst.setString(3, mobile);
            pst.setString(4, empid);

            pst.executeUpdate();
            JOptionPane.showMessageDialog(null, "Record Updateee!!!!!");
            table_load();
            txtName.setText("");
            txtSalary.setText("");
            txtMobile.setText("");
            txtName.requestFocus();
           }

      catch (SQLException e1)
         {
             e1.printStackTrace();
         }
      }
Delete
you can use the following code snippet to Delete the records.
Paste code inside the Delete button.
      String empid;
      empid = txtid.getText();

     try {
           pst = con.prepareStatement("delete from employee  where id = ?");

           pst.setString(1, empid);

           pst.executeUpdate();
           JOptionPane.showMessageDialog(null, "Record Deleteeeeee!!!!!");
           table_load();
           txtName.setText("");
           txtSalary.setText("");
           txtMobile.setText("");
           txtName.requestFocus();
        }

       catch (SQLException e1)
          {

               e1.printStackTrace();
          }
       }
i have attached the video link below. which will do this tutorials step by step.