This tutorial will teach you how to make simple Crud Application using Laravel 9 with Vue JS Frontend application using Api access crudapplication.
First Step What you have to do is you to divide the FrondEnd and BackEnd.
FrondEnd – Vue JS
BackEnd – Laravel 9
Create the folder myprojects. inside the folder frond end project you maintaing with the seperate folder.
backend project
Install Laravel 9
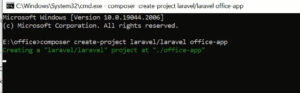
Create a new Project type the command on the command prompt . I create the project name Office
type the command office-backend
composer create-project laravel/laravel office-backend
After Type the Command you have to wait till the project has been created. in this example i gave the project name as office-app. instead of that you have to give office-backend
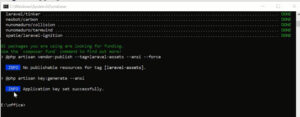
after created the project you will get the success message i attached the screen shot below.
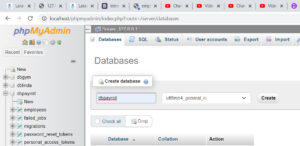
Second Step : You have to create the database so you have to go the mysql by typing the browser address bar http://localhost/phpmyadmin then you will get the database dashboard after that you have to create the new database. I attached the screen shot image below.in this example i have create the database name is office.
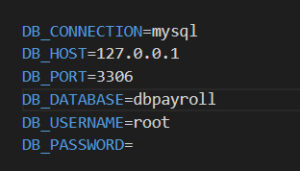
after create the database.you have to open your project into Visual Studio Code Editor. after that you have to configure the database details into Laravel project .env file. i attach the database details below.

in this section DB-DATABASE you have to give the name of the database which you have created.
After that run and check the application of the welcome screen of Laravel framework look like this.
Create Migration
Create the tables by typing this command
php artisan make:migration create_employees_table
After that inside database folder create_employees_table.php migrations file has been created. you can open the file.
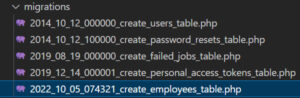
Click and open the create_employees_table.php file. you can see by default look like this.
public function up()
    {
        Schema::create('employees', function (Blueprint $table) {
            $table->id();
            $table->timestamps();
        });
    }
then you have to include the following fields.
$table->string(‘name’);
$table->string(‘address’);
$table->string(‘mobile’);
inside the function up() .function i shown in below clearly.
   public function up()
    {
        Schema::create('employees', function (Blueprint $table) {
            $table->id();
            $table->string('name');
            $table->string('address');
            $table->string('mobile');
            $table->timestamps();
        });
    }
After done the Stuff you have save them before run the migration command
After that type the following command on the console.
php artisan migrate
the table has been created.you can check on the database.
Create Controller
Create the controller name which is EmployeeController
php artisan make:controller EmployeeController
after that open up the EmployeeController
EmployeeController
All view pages are manageable through the Controller. you have to add the Model namespace here
use App\Models\Employee; Data is coming from the database via the Model. Model is the part where communicate the with database to pass the data to the controller.
In the Employee Controller we have 4 different functions(Index,Store,Update,destroy) shall able to perform the Crud operations.
Lets Learn by On by One
index() Function : inside the index function we have written following codes.
$employees = Employee::all();
return response()->json($employees);
Employee::all(); in this code snippet describes get all the Employee details from Model Class which name is Employee and assign to $employees variable and pass as Json Format.
store() Function : public function store(Request $request) : in this code snippet describes when fill the form on the Front End(Vue JS) click Save button all the form data come and store variable $request.then set Form variable to database tables columns then assign to $employees variables.after that call $employees->save(); then record insert successfully get the response as json format.
public function store(Request $request)
    {
        $employees = new Employee([
            'name' => $request->input('name'),
            'address' => $request->input('address'),
            'mobile' => $request->input('mobile'),

        ]);
        $employees->save();
        return response()->json('Employee created!');
    }
Update() Function : public function update(Request $request, $id) : in this code snippet describes when we make the changes of the form on the Front End(Vue JS) click Save button all the form data come and store variable $request along the $id variable. then set all the Form variable to database tables columns match with id find($id); variable.after that call $employees->update(); then record update successfully get the response as json format.
public function update(Request $request, $id)
    {
       $employees = Employee::find($id);
       $employees->update($request->all());
       return response()->json('Employee updated');
    }
destroy($id) Function : public function destroy($id) in this code snippet describes when click the delete button on the table row of the Front End(Vue JS) application get the id of row record and find($id); method to find the id. then delete the entire row records.
public function destroy($id)
    {
        $employees = Employee::find($id);
        $employees->delete();
        return response()->json(' deleted!');
    }
Full Code of the EmployeeController
<?php
namespace App\Http\Controllers;
use Illuminate\Http\Request;
use App\Models\Employee;

class EmployeeController extends Controller
{
    public function index()
    {
        $employees = Employee::all();
        return response()->json($employees);
    }
    public function store(Request $request)
    {
        $employees = new Employee([
            'name' => $request->input('name'),
            'address' => $request->input('address'),
            'mobile' => $request->input('mobile'),
        ]);
        $employees->save();
        return response()->json('Employee created!');
    }
    public function show($id)
    {
        $contact = Employee::find($id);
        return response()->json($contact);
    }
    public function update(Request $request, $id)
    {
       $employees = Employee::find($id);
       $employees->update($request->all());
       return response()->json('Employee updated');
    }
    public function destroy($id)
    {
        $employees = Employee::find($id);
        $employees->delete();
        return response()->json(' deleted!');
    }
}
Create Model
Model is used to get the data from the database.
Create the Model name which is Employee
<?php

namespace App\Models;

use Illuminate\Database\Eloquent\Factories\HasFactory;
use Illuminate\Database\Eloquent\Model;

class Employee extends Model
{
    protected $table = 'employees';
    protected $primaryKey = 'id';
    protected $fillable = ['name', 'address', 'mobile'];

    use HasFactory;
}
After that set Routes
go to the folder Routes inside folder select Routes file as api.php
<?php

use Illuminate\Http\Request;
use Illuminate\Support\Facades\Route;

use App\Http\Controllers\EmployeeController;


Route::get('/employees',[EmployeeController::class, 'index']);

Route::post('/save',[EmployeeController::class, 'store']);

Route::put('/update/{id}',[EmployeeController::class, 'update']);

Route::delete('/delete/{id}',[EmployeeController::class, 'destroy']);


Route::middleware('auth:sanctum')->get('/user', function (Request $request) {
    return $request->user();
});
Now BackEnd Part is Done. let’s start the Frond-End Part
Vue.js
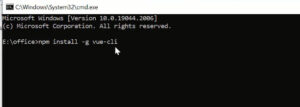
Install Vue.js CLI
npm install -g vue-cli
After installed successfully create the vue.js project using following command
vue init webpack officefrontend
Do the Project configuration i attached the screen shot image below.give about your project details.after enter all the details and press enter key your project all dependencies get installing.
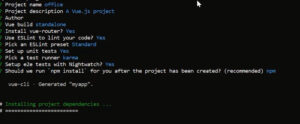
you have to wait until the process complete.
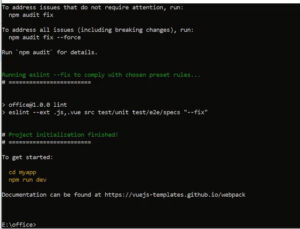
After complete the installing process you will get the success message i attached above.
you can see the screen shot how to get stated the project
Type on the console to open
cd my officefrontend
after that you have to open the project to visual code editor.
After open project go and set the routes

open the src folder inside the folder has folder routes folder inside the folder has file
index.js .here i am going to link the new component Router.
import Vue from 'vue'
import Router from 'vue-router'
import HelloWorld from '@/components/HelloWorld'
import EmployeeView from '@/components/EmployeeView'

Vue.use(Router)

export default new Router({
  routes: [
    {
      path: '/',
      name: 'HelloWorld',
      component: HelloWorld
    },

    {
      path: '/empview',
      name: 'EmployeeView',
      component: EmployeeView
    },


  ]
})
After that create the new component EmployeeView.vue
EmployeeView.vue.
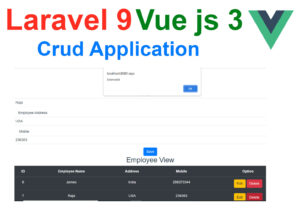
in this component i have created the crud operation.
Add records
View records
Update records
Delete records
<template>
    <div>
      <h2>Employee Registation</h2>
 <form @submit.prevent="save">
  <div class="form-group">
    <label>Employee name</label>
    <input type="text" v-model="employee.name" class="form-control"  placeholder="Employee name">

  </div>
  <div class="form-group">
    <label>Employee Address</label>
    <input type="text" v-model="employee.address" class="form-control"  placeholder="Employee Address">

  </div>

  <div class="form-group">
    <label>Mobile</label>
    <input type="text" v-model="employee.mobile" class="form-control"  placeholder="Mobile">

  </div>

  <button type="submit" class="btn btn-primary">Save</button>
</form>


      <h2>Employee View</h2>
      <table class="table table-dark">
  <thead>
    <tr>
      <th scope="col">ID</th>
      <th scope="col">Employee Name</th>
      <th scope="col">Address</th>
      <th scope="col">Mobile</th>
      <th scope="col">Option</th>
    </tr>
  </thead>
  <tbody>
    <tr v-for="employee in result" v-bind:key="employee.id">

          <td>{{ employee.id }}</td>
          <td>{{ employee.name }}</td>
          <td>{{ employee.address }}</td>
          <td>{{ employee.mobile }}</td>
          <td>
            <button type="button" class="btn btn-warning" @click="edit(employee)">Edit</button>
            <button type="button" class="btn btn-danger"  @click="remove(employee)">Delete</button>
          </td>
        </tr>

  </tbody>
</table>

    </div>
  </template>

  <script>
    import Vue from 'vue';
    import axios from 'axios';

     Vue.use(axios)


  export default {
    name: 'EmployeeView',
    data () {
      return {
        result: {},
        employee:{
                   id: '',
                   name: '',
                   address: '',
                   mobile: ''


        }
      }
    },
    created() {
        this.EmployeeLoad();
    },
    mounted() {
          console.log("mounted() called.......");

      },

    methods: {
           EmployeeLoad()
           {
                 var page = "http://127.0.0.1:8000/api/employees";
                 axios.get(page)
                  .then(
                      ({data})=>{
                        console.log(data);
                        this.result = data;
                      }
                  );
           },


           save()
           {
            if(this.employee.id == '')
              {
                this.saveData();
              }
              else
              {
                this.updateData();
              }

           },
           saveData()
           {
            axios.post("http://127.0.0.1:8000/api/save", this.employee)
            .then(
              ({data})=>{
                alert("saveddddd");
                this.EmployeeLoad();
              }
            )

           },
           edit(employee)
           {
            this.employee = employee;

           },
           updateData()
           {
              var editrecords = 'http://127.0.0.1:8000/api/update/'+ this.employee.id;
              axios.put(editrecords, this.employee)
              .then(
                ({data})=>{
                  this.employee.name = '';
                  this.employee.address = '',
                  this.employee.mobile = ''
                  this.id = ''
                  alert("Updated!!!");
                  this.EmployeeLoad();
                }
              );

           },

           remove(employee){

             var url = `http://127.0.0.1:8000/api/delete/${employee.id}`;


             // var url = 'http://127.0.0.1:8000/api/delete/'+ employee.id;
              axios.delete(url);
              alert("Deleteddd");
              this.EmployeeLoad();
            }
      }
  }
  </script>
i have attached the video link below. which will do this tutorials step by step.