In this tutorial, I will teach Java programming projects along with Object-Oriented Programming (OOP) concepts. I will demonstrate the correct way to implement OOP concepts in Java programming projects step by step. Object-Oriented Programming (OOP) concepts are a crucial part of programming. Let’s learn from here.
Model
First you have to create package com.project.model.
TargetModel.java
public class TargetModel {

    private int id;
    private String name;
    private Double amount;
    private String date;
    private boolean complete;

    public String getName() {
        return name;
    }


    public void setName(String name) {
        this.name = name;
    }


    public Double getAmount() {
        return amount;
    }

    public void setAmount(Double amount) {
        this.amount = amount;
    }


    public String getDate() {
        return date;
    }


    public void setDate(String date) {
        this.date = date;
    }

    public int getId() {
        return id;
    }

    public void setId(int id) {
        this.id = id;
    }


    public boolean isComplete() {
        return complete;
    }

    public void setComplete(boolean complete) {
        this.complete = complete;


}
We created the database ‘payrollsystem.’ Inside the database, we created a table named ’employees’ in the MySQL database. After that, we created the package package com.project.db.
import java.sql.*;

public class DB
{

    static Connection con;
    static String driver = "com.mysql.cj.jdbc.Driver";
    static String url = "jdbc:mysql://localhost:3306/ifc";
    static String uname = "root";
    static String pass = "root123";


    public static Connection getConn() throws Exception{
        if(con == null){
            Class.forName(driver);
            con = DriverManager.getConnection(url,uname, pass);
        }
        return con;

    }

}
After that, we created the package com.project.controller and created the controller TargetController
TargetController
public class TargetController {

    public static boolean save(TargetModel target)
    {


        try {
               Connection con = DB.getConn();
            PreparedStatement pst = con.prepareStatement("insert into target(name,amount,date)values(?,?,?)");
            pst.setString(1, target.getName());
            pst.setDouble(2, target.getAmount());
             pst.setString(3, target.getDate());
             pst.executeUpdate();
            return true;

        } catch (ClassNotFoundException ex) {
            Logger.getLogger(TargetController.class.getName()).log(Level.SEVERE, null, ex);
        } catch (SQLException ex) {
            Logger.getLogger(TargetController.class.getName()).log(Level.SEVERE, null, ex);

        } catch (Exception ex) {
            Logger.getLogger(TargetController.class.getName()).log(Level.SEVERE, null, ex);
        }
        return false;
     }

    public static List<TargetModel> getAll(){
         List<TargetModel> list = new ArrayList<>();
          String sql = "select * from target";
        try {
          Connection con = DB.getConn();

            PreparedStatement ps = con.prepareStatement(sql);
            ResultSet rs = ps.executeQuery();
            while(rs.next())
            {
                TargetModel t = new TargetModel();
                 t.setId(rs.getInt("id"));
                t.setName(rs.getString("name"));
                t.setAmount(rs.getDouble("amount"));
                 t.setDate(rs.getString("date"));
                  t.setComplete(rs.getBoolean("complete"));
                 list.add(t);
            }

        } catch (Exception ex) {
            ex.printStackTrace();
        }
         return list;

    }

    public static TargetModel getID(int id)
    {
        TargetModel t = new TargetModel();
        String sql = "select * from target where id=?";
         Connection con;
        try {
            con = DB.getConn();

            PreparedStatement ps = con.prepareStatement(sql);
            ps.setInt(1, id);
            ResultSet rs2 = ps.executeQuery();

             if(rs2.next())
            {

                 t.setId(rs2.getInt("id"));
                t.setName(rs2.getString("name"));
                t.setAmount(rs2.getDouble("amount"));
                 t.setDate(rs2.getString("date"));
                  t.setComplete(rs2.getBoolean("complete"));

            }


        } catch (Exception ex) {
            ex.printStackTrace();
        }


        return t;
    }


    public static boolean update(TargetModel target)
    {

         try {
               Connection con = DB.getConn();
            PreparedStatement pst = con.prepareStatement("update target set name=?,amount=?,date=? where id=?");
            pst.setString(1, target.getName());
            pst.setDouble(2, target.getAmount());
             pst.setString(3, target.getDate());
             pst.setInt(4, target.getId());
             pst.executeUpdate();
            return true;

        } catch (ClassNotFoundException ex) {
            Logger.getLogger(TargetController.class.getName()).log(Level.SEVERE, null, ex);
        } catch (SQLException ex) {
            Logger.getLogger(TargetController.class.getName()).log(Level.SEVERE, null, ex);

        } catch (Exception ex) {
            Logger.getLogger(TargetController.class.getName()).log(Level.SEVERE, null, ex);
        }
        return false;
    }


    public static boolean delete(int id)
    {

         try {
               Connection con = DB.getConn();
            PreparedStatement pst = con.prepareStatement("delete from target where id = ?");
             pst.setInt(1, id);
             pst.executeUpdate();
            return true;

        } catch (ClassNotFoundException ex) {
            Logger.getLogger(TargetController.class.getName()).log(Level.SEVERE, null, ex);
        } catch (SQLException ex) {
            Logger.getLogger(TargetController.class.getName()).log(Level.SEVERE, null, ex);

        } catch (Exception ex) {
            Logger.getLogger(TargetController.class.getName()).log(Level.SEVERE, null, ex);
        }
        return false;

    }


}
View
we designed the swing GUI design.After that created the package com.project.view.
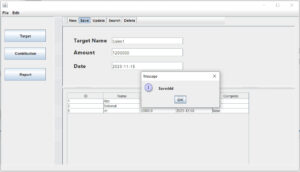
Target.java
Save
The save button is used to store data into the MySQL database. To implement this functionality, double-click on the save button and paste the code inside
String targetname = txtName.getText();
        String amount = txtAmount.getText();
        String date = txtDate.getText();


        TargetModel t = new TargetModel();
        t.setName(targetname);
        t.setAmount(Double.parseDouble(amount));
        t.setDate(date);


       boolean save = TargetController.save(t);

        if(save)
        {
            JOptionPane.showMessageDialog(this,"Saveddd");
              txtName.setText("");
              txtAmount.setText("");
              txtDate.setText("");
              txtName.requestFocus();
              loadTable();
        }
        else
        {
            JOptionPane.showMessageDialog(this,"Faileddd");
        }
View Data
Retrieve data from the MySQL database to pass into JTable by creating a method called load(). Inside this method, paste the following code.
public void loadTable()
 {
     DefaultTableModel m =  (DefaultTableModel) jTable1.getModel();
     m.setRowCount(0);
     List<TargetModel> list = TargetController.getAll();
     for(TargetModel tm :list)
     {
         Object[] row = {tm.getId(),tm.getName(),tm.getAmount(),tm.getDate(),tm.isComplete()};
         m.addRow(row);
     }

 }
After completing the implementation, make sure to call the load method inside the constructor of the class. This ensures that when the application runs, all the data will be loaded. See the example below on how to call it inside the constructor.
Before updating the data, it is necessary to select the row that needs to be updated. Click on the row to select it from the table, and the selected row’s record will be passed to the form for editing.
Update the Data
Create the Variable int id1;
private void jTable1MouseClicked(java.awt.event.MouseEvent evt) {

    int row = jTable1.getSelectedRow();
    if(row!= 1)
    {
      String id = jTable1.getValueAt(row, 0).toString();
       TargetModel t2 = TargetController.getID(Integer.parseInt(id));


     id1 = t2.getId();
    txtName.setText(t2.getName());
     txtAmount.setText(String.valueOf(t2.getAmount()));
    txtDate.setText(t2.getDate());

    }
}
Update the Data to the Database
String targetname = txtName.getText();
       String amount = txtAmount.getText();
       String date = txtDate.getText();


       TargetModel t = new TargetModel();
       t.setName(targetname);
       t.setAmount(Double.parseDouble(amount));
       t.setDate(date);
      t.setId(id1);


      boolean update = TargetController.update(t);

       if(update)
       {
           JOptionPane.showMessageDialog(this,"Updatedddd");
             txtName.setText("");
             txtAmount.setText("");
             txtDate.setText("");
             txtName.requestFocus();
             loadTable();
       }
       else
       {
           JOptionPane.showMessageDialog(this,"Faileddd");
       }
Delete the Data to the Database
boolean delete = TargetController.delete(id1);

        if(delete)
        {
            JOptionPane.showMessageDialog(this,"Deletedddd");
              txtName.setText("");
              txtAmount.setText("");
              txtDate.setText("");
              txtName.requestFocus();
              loadTable();
        }
        else
        {
            JOptionPane.showMessageDialog(this,"Faileddd");
        }
Download the Full Source code by Install our App on Google PlayStore There is Section Java Source code link in the App:
i have attached the video link below. which will do this tutorials step by step.