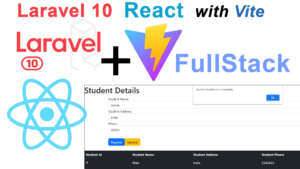
In this tutorial will teach React JS Laravel 10 CRUD using Vite step by step. Laravel 10 CRUD Application we will cover about Create, Read, Update, and Delete and View crud operation in Laravel. Generate the Api is very easy task to transfer data using various front end applications like React,Vue,Angular etc.
Laravel is world best famous PHP framework.it has various features. Laravel is a MVC architecture. crud using Laravel example I will show in the simple way to make eloquent Laravel crud application. Here is the best place where learn Laravel 10.laravel php used to create the web application very easy to create and hosting the application.
Installing Laravel 10
Create the new project which name is lbs-app.type by following command to create the Laravel project.
composer create-project laravel/laravel lbs-app
After Type the Command you have to wait until the project installation get finish. After Finished it.let’s do the setup on database.
Change .env File
Do the database configuration on .env File for username, password and DB Name in this project i have changed the database name as lbs
After that run the project.
Run the Project
Run the Application using following command
php artisan serve
Create Migrations
In Laravel create the table called as Migration
Run the command to create the Migration
php artisan make:migration create_students_table
After that you can check the inside database folder migrations create_students_table file has been created
successfully.
Select and open the students table. add the following table fields stname,address,phone
<?php
use Illuminate\Database\Migrations\Migration;
use Illuminate\Database\Schema\Blueprint;
use Illuminate\Support\Facades\Schema;
return new class extends Migration
{

    public function up(): void
    {
        Schema::create('students', function (Blueprint $table) {
            $table->id();
            $table->string('name');
            $table->date('address');
            $table->string('phone')->nullable();
            $table->timestamps();
        });
    }

    public function down(): void
    {
        Schema::dropIfExists('students');
    }
};
After modified the columns names then run the migrate command to create the tables in the databases.before the run the
command please save project then run it.
php artisan migrate
Create Controller Api Controller
Create Controller
in order to create the controller if it crud you can use StudentController –api.
php artisan make:controller StudentController --api
After create the controller need to create the model.
Create Model
Model is used to get the data from the database.
Create the Model name which is Student
php artisan make:model Student
After Model is Created the look like this. Code inside Model Class (app\Models\)
Change it as like this
Add the Namespace above
namespace App\Models;
<?php
namespace App\Models;
use Illuminate\Database\Eloquent\Factories\HasFactory;
use Illuminate\Database\Eloquent\Model;
class Employee extends Model
{
  protected $table = 'students';
  protected $primaryKey = 'id';
   protected $fillable = [
        'name',
        'address',
        'phone',
    ];
    use HasFactory;
}
Routes
Pages are Manage through routes. If you are crud system simple you can add it the routes one line look like this
<?php
use Illuminate\Support\Facades\Route;
use App\Http\Controllers\API\StudentController;
Route::get('/', function () {
    return view('welcome');
});

Route::apiResource('/student', StudentController::class);
List the Routes
php artisan route:list
After created the controller paste this following code snippet
<?php
namespace App\Http\Controllers;
use Illuminate\Http\Request;
use App\Models\Employee;
class EmployeeController extends Controller
{
    protected $student;
    public function __construct(){
        $this->student = new Student();

    }
    public function index()
    {
        return $this->student->all();

    }

    public function store(Request $request)
    {
     return $this->student->create($request->all());


    }

    public function show(string $id)
    {
     $student = $this->student->find($id);
    }

    public function update(Request $request, string $id)
    {
         $student = $this->student->find($id);
         $student->update($request->all());
         return $student;
    }
    public function destroy(string $id)
    {
     $student = $this->student->find($id);
    return $student->delete();
    }
}
API Test URL


React using vite
npm create vite@latest
after run ask the project name of front you can put the project name
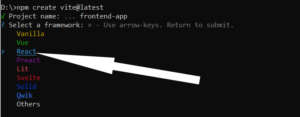
you can select as react here as i show the screen shot above.
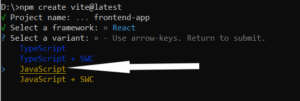
after that select as javascript from list.press enter key .after project is created you have to open the project on vscode editor and do the following steps to run the application.
cd frontend-app
npm install
npm run dev
After Create the Components folder. inside the folder create the file as Student.jsx.
Install axois
npm i axois
Student.jsx
Paste the following code snippet
import axios from 'axios';
import {useEffect, useState } from "react";

function Student()
{
  const [id, setId] = useState('');
  const [name, setName] = useState("");
  const [address, setAddress] = useState("");
  const [phone, setPhone] = useState("");
  const [students, setStudents] = useState([]);

useEffect(() => {
  (async () => await Load())();
  }, []);

  async function  Load()
  {
     const result = await axios.get(
         "http://127.0.0.1:8000/api/student");
         setStudents(result.data);
         console.log(result.data);
  }


     async function save(event)
    {
        event.preventDefault();
    try
        {
         await axios.post("http://127.0.0.1:8000/api/student",
        {

          name: name,
          address: address,
          phone: phone

        });
          alert("Student Registation Successfully");
          setId("");
          setName("");
          setAddress("");
          setPhone("");
          Load();

        }
    catch(err)
        {
          alert("Student Registation Failed");
        }
   }
   async function editStudent(students)
   {
    setName(students.name);
    setAddress(students.address);
    setPhone(students.phone);

    setId(students.id);

   }


   async function DeleteStudent(id)
   {

        await axios.delete("http://127.0.0.1:8000/api/student/" + id);
        alert("Student deleted Successfully");
        Load();

   }


   async function update(event)
   {
    event.preventDefault();

   try
       {

        await axios.put("http://127.0.0.1:8000/api/student/"+ students.find(u => u.id === id).id || id,
       {
         id: id,
         name: name,
         address: address,
         phone: phone

       });
         alert("Registation Updateddddd");
         setId("");
         setName("");
         setAddress("");
         setPhone("");
         Load();

       }
   catch(err)
       {
         alert("User Registation Failed");
       }
  }

  return (
    <div>
       <h1>Student Details</h1>
       <div class="container" >
          <form>
              <div class="form-group">
               <input  type="text" class="form-control" id="student_id" hidden
               value={id}
               onChange={(event) =>
                {
                  setId(event.target.value);
                }}

               />
                <label>Student Name</label>
                <input  type="text" class="form-control" id="studentName"
                value={name}
                onChange={(event) =>
                  {
                    setName(event.target.value);
                  }}
                />
              </div>
              <div class="form-group">
                <label>Student Address</label>
                <input  type="text" class="form-control" id="studentAddress"
                 value={address}
                  onChange={(event) =>
                    {
                      setAddress(event.target.value);
                    }}
                />
              </div>

              <div class="form-group">
                <label>Phone</label>
                <input type="text" class="form-control" id="studentPhone"
                  value={phone}
                onChange={(event) =>
                  {
                    setPhone(event.target.value);
                  }}
                />
              </div>

                 <div>
              <button   class="btn btn-primary mt-4"  onClick={save}>Register</button>
              <button   class="btn btn-warning mt-4"  onClick={update}>Update</button>
              </div>
            </form>
          </div>
<div>
    <br/>

<table class="table table-dark" align="center">
  <thead>
    <tr>
      <th scope="col">Student Id</th>
      <th scope="col">Student Name</th>
      <th scope="col">Student Address</th>
      <th scope="col">Student Phone</th>

      <th scope="col">Option</th>
    </tr>
  </thead>
       {students.map(function fn(student)
       {
            return(
            <tbody>
                <tr>
                <th scope="row">{student.id} </th>
                <td>{student.name}</td>
                <td>{student.address}</td>
                <td>{student.phone}</td>
                <td>
                    <button type="button" class="btn btn-warning"  onClick={() => editStudent(student)} >Edit</button>
                    <button type="button" class="btn btn-danger" onClick={() => DeleteStudent(student.id)}>Delete</button>
                </td>
                </tr>
            </tbody>
            );
            })}
            </table>
       </div>
       </div>
            );
        }

export default Student;
App.jsx
import Student from "./components/Student"


function App() {


  return (
        <Student/>
  )
}

export default App
i have attached the video link below. which will do this tutorials step by step.