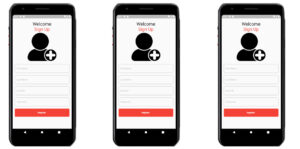
This Flutter tutorial will teach you how to create the Sign up Screen.due to current techoligal demend we also created an app you friendly.The app is developed steps ahead of the existing world. While app development will be very useful for the future as well.
Main.dart
import 'package:flutter/material.dart';
import 'package:mylogin/sign_up.dart';

void main() {
  runApp(MyApp());
}

class MyApp extends StatelessWidget {
  // This widget is the root of your application.
  @override
  Widget build(BuildContext context) {
    return MaterialApp(
      title: 'Flutter Demo',
      debugShowCheckedModeBanner: false,
      theme: ThemeData(


        primarySwatch: Colors.blue,
      ),
      home: Signup(),
    );
  }
}
sign_up.dart
import 'package:flutter/material.dart';

class Signup extends StatefulWidget {
  const Signup({ Key key }) : super(key: key);

  @override
  _SignupState createState() => _SignupState();
}

class _SignupState extends State<Signup> {
  @override
  Widget build(BuildContext context) {
     var size = MediaQuery.of(context).size;
    return Scaffold(
      body: SafeArea(
        child: SingleChildScrollView(
          child: Container(
             padding:EdgeInsets.symmetric(horizontal: 15,vertical: 20),
                 child: Column(
                   children: [
                     Text("Welcome",style: TextStyle(fontSize: 30, color: Colors.black)),
                     Text("Sign Up",style: TextStyle(fontSize: 30, color: Colors.red)),
                     Center(
                       child: Image.asset('assets/images/sign-up.png',
                                   width: 200,
                                   height: 200,),
                     ),
                      SizedBox(height: 15,),
                      TextField(
                             decoration: InputDecoration(
                               labelText: "First Name",
                               labelStyle: TextStyle(fontSize: 15,color: Colors.grey.shade400),
                               border: OutlineInputBorder(borderRadius: BorderRadius.circular(10))
                             ),
                 ),
                   SizedBox(height: 15,),
                 TextField(
                             decoration: InputDecoration(
                               labelText: "Last Name",
                               labelStyle: TextStyle(fontSize: 15,color: Colors.grey.shade400),
                               border: OutlineInputBorder(borderRadius: BorderRadius.circular(10))
                             ),

                 ),
                   SizedBox(height: 15,),
                  TextField(
                             decoration: InputDecoration(
                               labelText: "Email ID",
                               labelStyle: TextStyle(fontSize: 15,color: Colors.grey.shade400),
                               border: OutlineInputBorder(borderRadius: BorderRadius.circular(10))
                             ),
                 ),
                   SizedBox(height: 15,),
                   TextField(
                             obscureText: true,
                             decoration: InputDecoration(
                               labelText: "Password",
                               labelStyle: TextStyle(fontSize: 15,color: Colors.grey.shade400),
                               border: OutlineInputBorder(borderRadius: BorderRadius.circular(10))
                             ),
                 ),
                  SizedBox(height: 15,),
                    Container(
                       height: size.height / 14,
                        width: size.width,
                      alignment: Alignment.center,
                     decoration: BoxDecoration(color: Colors.red,
                        borderRadius: BorderRadius.circular(5)),
                        child: Text("Register ",
                                  style: TextStyle(color: Colors.white,
                                  fontWeight: FontWeight.bold),),
                    )
                   ],
                 ),
          ),
        ),
      ),
    );
  }
}
in order to add the images. create folder assets inside folder create another folder images.you have to put the images then pubspec.yaml we have to give the path.
assets:
    - assets/images/
I have attached the video tutorial below it will help you to do this step by step.