The Point of sales System is developed using Java and mysql. The project is built to manage sales and transactions. To make a new transaction, fields such as: product name, qty and payment needs to be selected. If you like to learn point of sales systems step by step, this is the right place to learn from the beginning.point of sale system using java netbeans IDE
which is the best editor for writing the code and design the UI easily.
why pos is important
Point of Sale systems are essential part of each industries for making sales and transaction very easily.
point of sales system features
1.manage the stocks.
2.manage the sales and transactions.
3.daily and weekly and monthly generating reports.
4.customer management.
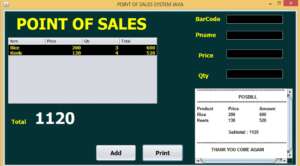
that’s why importance of point of sale system in every business. attached the Screen Shot image below along with point of sale system java source code. i attached the video tutorials below. You will able to learn from it.
Create the Database. which name is rbc inside the database create the table
First we have to search the barcode select the Textfield and select Event keyReleased
private void txtidKeyReleased(java.awt.event.KeyEvent evt)
{
  try {
            Class.forName("com.mysql.jdbc.Driver");
            con = DriverManager.getConnection("jdbc:mysql://localhost/rbc","root","");
            String id = txtid.getText();
            pst = con.prepareStatement("select id,barcode,product,price from product where barcode = ?");
            pst.setString(1, id);
            ResultSet rs = pst.executeQuery();
            if(rs.next()==true)
            {
                String prodname = rs.getString(3);
                String price = rs.getString(4);
                txtpname.setText(prodname);
                txtprice.setText(price);
            }
            else
            {
                 txtpname.setText("");
                 txtprice.setText("");
            }

        } catch (ClassNotFoundException ex) {
            Logger.getLogger(find.class.getName()).log(Level.SEVERE, null, ex);
        } catch (SQLException ex) {
            Logger.getLogger(find.class.getName()).log(Level.SEVERE, null, ex);
        }
    }
After receiving the product name and price where the user has the option to add the qty by clicking the add button to see all Products details which will be shown in the below table.
String panme = (txtpname.getText());
            int price = Integer.parseInt(txtprice.getText());
            int qty = Integer.parseInt(txtqty.getText());
            int tot = qty * price;

            model = (DefaultTableModel)jTable1.getModel();

            model.addRow(new Object[]
                    {

                        panme ,
                        price,
                        qty,
                        tot,
                    });

            int sum = 0;

             for(int i = 0; i<jTable1.getRowCount(); i++)
        {
            sum = sum + Integer.parseInt(jTable1.getValueAt(i, 3).toString());
        }

        txtotal.setText(Integer.toString(sum));

        txtid.setText("");
        txtpname.setText("");
        txtprice.setText("");
        txtqty.setText("");
        txtid.requestFocus();
Bill Design
public void bill()
    {
        String total = txtotal.getText();
        DefaultTableModel model = new DefaultTableModel();
        model = (DefaultTableModel)jTable1.getModel();
        txtbill.setText(txtbill.getText() + "******************************************************\n");
        txtbill.setText(txtbill.getText() + "                                POSBILL                          \n");
        txtbill.setFont(txtbill.getFont().deriveFont(Font.BOLD, 13f));

        txtbill.setText(txtbill.getText() + "*******************************************************\n");
         //Heading
          txtbill.setText(txtbill.getText() + "Product" + "\t" + "Price" + "\t" + "Amount" + "\n"  );

          for(int i = 0; i < model.getRowCount(); i++)
          {
              String pname = (String)model.getValueAt(i, 0);
              int price = (Integer)model.getValueAt(i, 1);
              int amount = (Integer)model.getValueAt(i, 3);
              txtbill.setText(txtbill.getText() + pname  + "\t" + price + "\t" + amount  + "\n"  );
          }
          txtbill.setText(txtbill.getText() + "\n");
          txtbill.setText(txtbill.getText() + "\t" +  "Subtotal : " + total + "\n");
          txtbill.setText(txtbill.getText() + "\n");
          txtbill.setText(txtbill.getText() + "*******************************************************\n");
          txtbill.setText(txtbill.getText() + "           THANK YOU COME AGAIN             \n");
    }
i have attached the video link below. which will do this tutorials step by step.