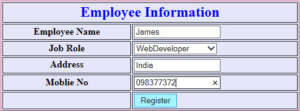
This tutorial will teach you how to make Registation form using Jsp Servlet Mysql Maven step by step.we have created the file index.jsp.
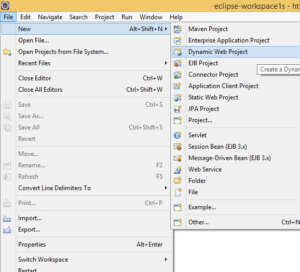
First Step : Open Eclipse IDE Create a New Project -> File -> New->Dynamic Web Project
After Select Dynamic Web Project you will have a screen like this
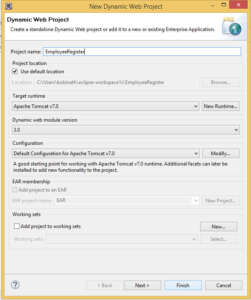
Type the Project Name Click Finish. After that select the Project and right click you will have a screen shown below.
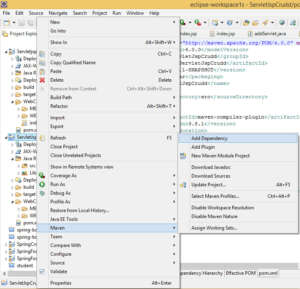
Configure->Convert to Maven Project.

After Selected.you will have a screen like this.
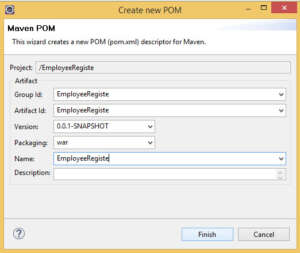
Click Finish.After that.
Add a new Dependency
You will add the Mysql Connector here .Enter groupId,artifactid or sha1 prefix or pattern textbox type the Dependency name Mysql Connector. you can get the result on the search result below.
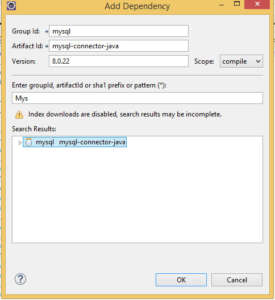
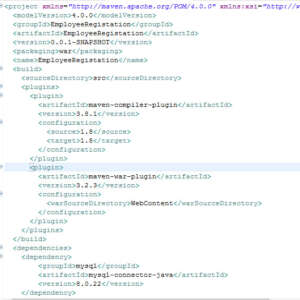
Select the Mysql Connector Click Ok Button.
After that create the index,jsp File.
Paste the Code Inside the index.jsp
<html>
<body bgcolor="#fffff" >
<form method="post" action="addServlet">
<table width= 500px cellpadding ="2" cellspacing = "2" align ="center"
border ="1" bordercolor ="#FF69B4" bgcolor ="#E6E6FA">
<tr>
<td align ="center" colspan = "2"><font color ="#0000F"><h2>Employee Information</h2></font></td>
</tr>
<tr>
<td align ="center"><b>Employee Name</td>
<td><input type="text" size="20" name="ename"></td>
</tr>
<tr>
<td align ="center" valign ="top"><b>Job Role<b></td>
<td><select name="jobrole">
<option value="WebDeveloper">WebDeveloper</option>
<option value="GraphicDesigner">GraphicDesigner</option>
<option value="SoftwareDeveloper">SoftwareDeveloper</option>
</select>
</td>
</tr>
<tr>
<td align ="center" valign="top"><b>Address<b></td>
<td><input type=text name="address"></textarea>
</td>
</tr>
<tr>
<td align ="center"><b>Moblie No<b></td>
<td><input type="text" size="20" maxlength="10" name="mno"></td>
</tr>
<tr>
<td align ="center"> </td>
<td><input type="submit" value="Register" /></td>
</tr>
</table>
</form>
</body>
</html>After that Create the Servlet File which name is addServlet
Paste the Code
import java.io.IOException;
import java.io.PrintWriter;
import java.sql.DriverManager;

import javax.servlet.ServletException;
import javax.servlet.annotation.WebServlet;
import javax.servlet.http.HttpServlet;
import javax.servlet.http.HttpServletRequest;
import javax.servlet.http.HttpServletResponse;
import java.sql.*;

@WebServlet("/addServlet")
public class addServlet extends HttpServlet {

	PreparedStatement st1=null;
	Connection con;

	protected void doPost(HttpServletRequest request, HttpServletResponse response) throws ServletException, IOException
	{
		PrintWriter out = response.getWriter( );

		 String  empname =request.getParameter("ename");
		 String  jobrole =request.getParameter("jobrole");
		 String addr =request.getParameter("address");
		 String mobile =request.getParameter("mno");

		try
		{
			Class.forName("com.mysql.cj.jdbc.Driver");
	        con = DriverManager.getConnection("jdbc:mysql://localhost/melwaa", "root","");
	        String query ="insert into employee(empname,jobrole,address,mobile) values(?,?,?,?)";
	        st1= con.prepareStatement(query);
			st1.setString(1, empname);
			st1.setString(2, jobrole);
			st1.setString(3, addr);
			st1.setString(4, mobile);
			int k = st1.executeUpdate();

		if(k ==1)
		{
		   out.println("Thanks for registration ......");
		   String query2 = "select max(id) from employee";
		   Statement st1 = con.createStatement( );
		   ResultSet rs1 = st1.executeQuery(query2);
		   rs1.next( );
		   String reg_No = rs1.getString(1);
		   out.println("Your registration id is " + reg_No);
		 }
		else
		 {
		    out.println("Cant' update");
		 }
	   }
		catch(Exception ee)
		 {
			System.out.println(ee.toString());
		  }

		}

	}
I have attached the video tutorial below it will help you to do this step by step.