This JDBC will teach you how to do basic database functions that are CREATE RETIEVE UPDATE and DELETE using Mysql Database. The INSERT, SELECT, UPDATE and DELETE statements can be used in any database system, because this is support by all relational database systems.the crud operations in java is very useful for your future projects.
We will learn how to INSERT, SELECT, UPDATE and DELETE in database by writing code to manage the records table in the database named dscomputers. records table consist of following columns name,item,price.
Feature of projects
The system shall be able to record computer details : name,item,price.
The system shall be able to retrieve the computer details : name,item,price.
Then system shall be able to Edit and Delete the computer details : name,item,price.
Learn how to make this System Step by step
Step 1: Download JDK Click here follow the steps and install it.
Step 2: Download an appropriate jdbc driver Click here in order to connect jdbc and mysql.
Step 3: Download xampp server Click here follow the steps and install it.
First Step : Create the Database. in this example we created as dscomputers as a Database Name.
After created the database you have create tables inside the database. i have created the table which name it as
records. records tables consist of following coloums (id,name,item,price)
id coloum should be AUTO INCREMENT Field.
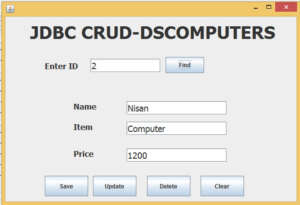
After Done the database design. lets moving to the Form Design .
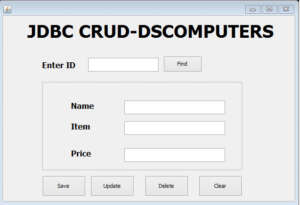
After Done the Design. Lets moving to the Code Part.
First Step : we have to create the method maintenance that are CREATE RETIEVE UPDATE and DELETE all the functions can manage. switch case will manage all crud crud operations.
At the top we add the namespace for writing the sql . import java.sql.*;
public void maintenance(int value)
	{
	 try
	    {
	    String name = txtname.getText();
	    String item = txtitem.getText();
            String price = txtprice.getText();
	    String id = txtid.getText();
	    //.........Connecting to the Data Base........
	    Class.forName("com.mysql.jdbc.Driver");
            con = DriverManager.getConnection("jdbc:mysql://localhost/dscomputers", "root","");

	switch(value)
		{
		//.......Inserting to the database........
	 case 1:
		 pst=con.prepareStatement("INSERT  INTO records(name,item,price) VALUES(?,?,?)");
		 pst.setString(1,name);
		 pst.setString(2,item);
		 pst.setString(3,price);
		 pst.executeUpdate();
		 pst.close();
		 break;
	    //..........Updateing the database.......

	 case 2:
		 pst=con.prepareStatement("UPDATE records SET name=?,item=?,price=? WHERE id=?");

		 pst.setString(1,name);
		 pst.setString(2,item);
		 pst.setString(3,price);
		 pst.setString(4,id);

		 pst.executeUpdate();
		break;

	    //.....Displaying records from the database...

	 case 3:
		 pst=con.prepareStatement("SELECT * FROM records WHERE id=?");
		 pst.setString(1,id);
		 ResultSet rs=pst.executeQuery();
	if(rs.next( )== false)
	{
		JOptionPane.showMessageDialog(null, "Couldn't Find the ID");
	}
	else
	{
		txtname.setText(rs.getString(2));
		txtitem.setText(rs.getString(3));
		txtprice.setText(rs.getString(4));
	}
		break;

	    //......Deleteing records from the database.........

	case 4:

		 pst=con.prepareStatement("delete from records WHERE id=?");
		 pst.setString(1,id);
		 pst.executeUpdate();
		break;

	case 5:
		txtname.setText("");
		txtitem.setText("");
		txtprice.setText("");
		break;
		 }
	}
	    //..........Handleing Exceptions in the program.......
	   catch(ClassNotFoundException e)
		{
		  System.err.println(e);
		}

	   catch(SQLException e)
		{
		  System.err.println(e);
		}
	}
Add Records
you can use the following code snippet to add the records in to database. paste the code inside the Save button.
maintenance(1); if you write what happens here is when you click save button it will goes to the function maintenance and search the case which would be match the value of 1. the particular case will be executed.record will be inserted in to the database.at the same time we will receieve message as record inserted successfully.after that we call the function maintenance(5); here also same thing happen search the case which would be match the value of 5. the particular case will be executed.which will match to clear the records.
maintenance(1);
JOptionPane.showMessageDialog(null,"Added successful..!!!!","DsComputers"
,JOptionPane.INFORMATION_MESSAGE);
maintenance(5);
Find Records
you can use the following code snippet to find the records in to database. paste the code inside the Find button.
maintenance(3); here also same thing happen search the case which would be match the value of 3. the particular case will be executed.which will match to Find the records.
maintenance(3);
Edit Records
maintenance(2); here also same thing happen search the case which would be match the value of 2. the particular case will be executed.which will match to edit the records.
maintenance(2);
JOptionPane.showMessageDialog(null,"Updated successful..!!!!","DsComputers"
,JOptionPane.INFORMATION_MESSAGE);
maintenance(3);
Delete Records
you can use the following code snippet to find the records in to database. paste the code inside the Delete button.
maintenance(4); here also same thing happen search the case which would be match the value of 4. the particular case will be executed.which will match to delete the records.
maintenance(4);
JOptionPane.showMessageDialog(null,"Deleted successful..!!!!","DsComputers"
,JOptionPane.INFORMATION_MESSAGE);
maintenance(5);
Clear Records
you can use the following code snippet to find the records in to database. paste the code inside the Delete button.
maintenance(5); here also same thing happen search the case which would be match the value of 5. the particular case will be executed.which will match to clear the records.
i have attached the video link below. which will do this tutorials step by step.