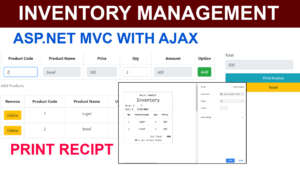
This tutorial will teach you how to make a Inventory Management System in ASP.NET MVC with Ajax step by step. This system will helpful you to learn Inventory Management System.this system helpful for you learn sales handling process of asp.net mvc with ajax.
Functional requirements
The System shall be able to find the barcode id of the products.in order to find the product details enter the barcode id in to the barcode id textbox then it will automatically find product details without loading page and produce the output in to the related textboxes.
This System shall be able to store the Sales details in to the SQLserver databases.after sales has been done.
The System shall be able to release the print receipt for print the bills.
Let learn how to do the system step by step
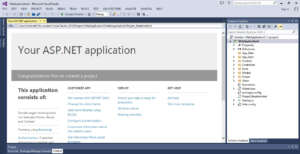
First go and open the visual studio and create the new project.
After that Select the language as Visual C# with ASP.NET Web Application
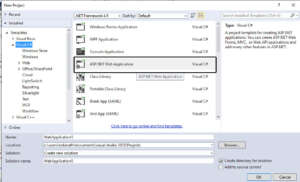
Click Ok
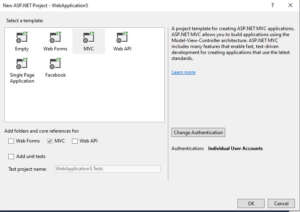
Select MVC Click Ok
First we have to study MVC Folder of project MVC stands for model-view-controller.
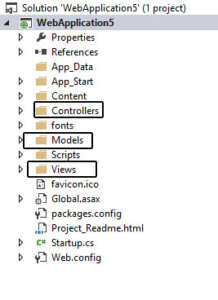
i have attached the folder structure above(Models,Views,Controllers)
this course i am going to cover about database first approach.for deal with models folder first.
Models
Create the database on the SQLserver.i have create database which name is possystem.
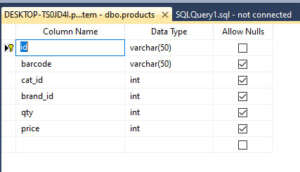
Product Table
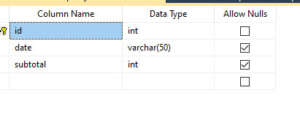
Sales
Sales_product
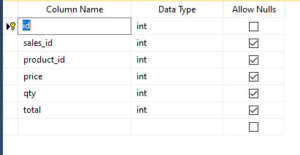
these are the table you have create on the SqlServer. id set as primarykey along with auto increment.i have attach the screen shot image below. How to do it.
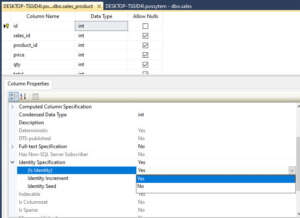
select the id column then go the id column properties below do it as Is Identity Yes.
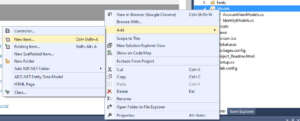
After created the all the tables then go the the visual studio back.
select model folder and right click do the following steps i attached screenshot image below.
Select Data with ADO.NET Entity Data Model
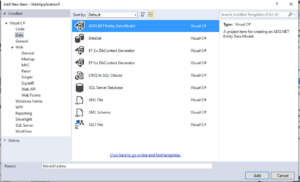
Click Add after that pop up Generate from database click Next.
Establish the Database Connection
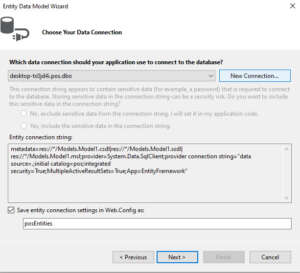
Click new Connection
Configure the Connection Properties
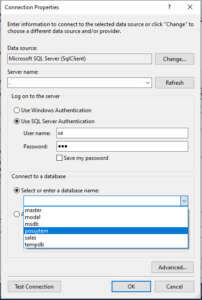
select database name and give username and password while you installing the SQLserver. and test the connection
if the connection has success click OK Button.
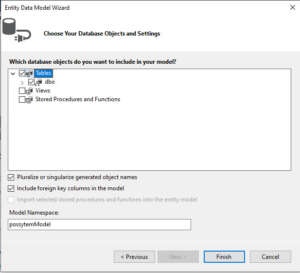
Select the table
Click finish
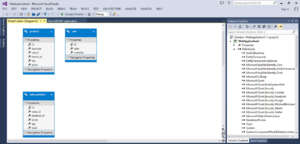
Model.edmx diagram is created successfully.
After that select you project install the following libraries.
Newtonsoft.Json
jquery
bootstarp
After that select the home controller paste this code.i attached video tutorial below watch and do it.
go to the controller folder and double click the HomeController paste the following code
HomeController
using Newtonsoft.Json;
using System;
using System.Collections.Generic;
using System.Linq;
using System.Web;
using System.Web.Mvc;
using WebApplication29.Models;

namespace WebApplication29.Controllers
{
    public class HomeController : Controller
    {
        //you don't need this here except you want to use Dependency injection

        possytemEntities10 dc = new possytemEntities10();

        public ActionResult Index()
        {
            return View();
        }

        public ActionResult Print()
        {
            ajaxModel model = (ajaxModel)TempData["Data"];
            //reassign temp data for reload purposes
            TempData["Data"] = model;
            return View(model);
        }

        [HttpPost]
        public JsonResult Getid(String Id)
        {
            //Get the products from products sample collection for demo purpose.
            //Get the products from the database in the real application
            var std = dc.products.Where(a => a.id == Id).FirstOrDefault();
            //return new JsonResult { Data = new { std = std } };
            return Json(std, JsonRequestBehavior.AllowGet);
        }


        [HttpPost]
        public JsonResult Save(string data)
        {
            ajaxModel model = JsonConvert.DeserializeObject<ajaxModel>(data);
            bool status = false;
            try
            {
                using (possytemEntities10 dc = new possytemEntities10())
                {
                    //insert into Sales table
                    var sale = new sale

                    {

                      date = DateTime.Now.ToString("d"), //ToString was used because the date in the model was string
                      subtotal = model.total
                  };
                   dc.sales.Add(sale);
                   dc.SaveChanges();

                    model.data.ForEach(m =>
                    {
                        //get the product and deduct the subtotal
                        var db_product = dc.products.First(e => e.id == m.barcode);
                        db_product.qty = db_product.qty - m.qty;

                        dc.sales_product.Add(new sales_product
                        {
                            sales_id = sale.id,
                            product_id = int.Parse(m.barcode),
                            price = m.pro_price,
                            qty = m.qty,
                            total = m.total_cost
                        });
                    });
                    dc.SaveChanges();
                    status = true;
                }
                return new JsonResult { Data = new { status, message = "Entry saved successfully" } };
            }
            catch (Exception e)
            {
                return new JsonResult { Data = new { status, message = "There was an error saving the Entry" } };
            }

        }

        [HttpPost]
        public ActionResult SaveNew(string data)
        {
            ajaxModel model = JsonConvert.DeserializeObject<ajaxModel>(data);
            bool status = false;
            try
            {
                using (possytemEntities10 dc = new possytemEntities10())
                {
                    //insert into Sales table
                    var sale = new sale
                    {
                        date = DateTime.Now.ToString("d"), //ToString was used because the date in the model was string
                        subtotal = model.total
                    };
                    dc.sales.Add(sale);
                    dc.SaveChanges();


                    model.data.ForEach(m =>
                    {
                        //get the product and deduct the subtotal
                        var db_product = dc.products.First(e => e.id == m.barcode);
                        db_product.qty = db_product.qty - m.qty;

                        dc.sales_product.Add(new sales_product
                        {
                            sales_id = sale.id,
                            product_id = int.Parse(m.barcode),
                            price = m.pro_price,
                            qty = m.qty,
                            total = m.total_cost
                        });
                    });
                    dc.SaveChanges();
                    model.date = sale.date;
                    model.orderId = sale.id;
                    status = true;
                }
                TempData["Data"] = model;
                return new JsonResult { Data = new { status, message = "Entry saved successfully"} };
                //return RedirectToAction("Print", model);
            }
            catch (Exception e)
            {
                return new JsonResult { Data = new { status, message = "There was an error saving the Entry" } };
            }

        }

        public string sales_id { get; set; }
    }
}
After that go the views folder there is the folder which name Shared inside the Shared folder there is the file which name is layout.cshtml. this is the layout file.
Layout File
Layout file is a common file for each page. Example you have the header and footer in your website. header and footer are common for each pages.it called as layout.content would be changed each pages like about us pages displays regarding about us content,Contact us pages displays regarding Contact us content.like that.layout.cshtml paste the following codes.
layout.cshtml
<!DOCTYPE html>
<html>
<head>
    <meta charset="utf-8" />
    <meta name="viewport" content="width=device-width, initial-scale=1.0">

    @Styles.Render("~/Content/css")
    @Scripts.Render("~/bundles/modernizr")
    @RenderSection("styles", false)
</head>
<body>

    <div class="container-fluid bg-2 text-center">
        @RenderBody()
    </div>

    @Scripts.Render("~/bundles/jquery")
    @Scripts.Render("~/bundles/bootstrap")
    @RenderSection("scripts", required: false)
</body>
</html>
After done that go the view folder inside the views folder there is folder Home inside the home folder folder paste the following code.
index.cshtml
@{
    ViewBag.Title = "Index";
}

<div class="row">
    <div class="col-sm-8">
        @using (Html.BeginForm("Index", "home", FormMethod.Post, new { id = "popupForm" }))
        {

            <table class="table table-bordered">
                <caption> Add Products  </caption>
                <tr>
                    <th>Product Code</th>
                    <th>Product Name</th>
                    <th>Price</th>
                    <th>Qty</th>

                    <th>Amount</th>
                    <th>Option</th>
                </tr>
                <tr align="center">
                    <td>
                        <input type="text" class="form-control" placeholder="barcode" id="barcode" name="barcode" size="25px" required>
                    </td>
                    <td>
                        <input type="text" class="form-control" placeholder="barcode" id="pname" name="pname" size="50px" disabled>
                        @*<label id="pro_name" name="pname" id="pname"></label>*@
                    </td>
                    <td>
                        <input type="text" class="form-control pro_price" id="pro_price" size="25px" name="pro_price"
                               placeholder="price" disabled>
                    </td>
                    <td>
                        <input type="number" class="form-control pro_price" id="qty" name="qty"
                               placeholder="qty" min="1" value="1" size="10px" required>
                    </td>

                    <td>
                        <input type="text" class="form-control" placeholder="total_cost" size="35px" id="total_cost" name="total_cost" disabled>
                    </td>
                    <td>
                        <button class="btn btn-success" type="button" onclick="addproduct()">
                            Add
                        </button>
                    </td>
                </tr>
            </table>
        }
        <table class="table table-bordered" id="product_list">
            <caption> Products</caption>
            <thead>
                <tr>
                    <th style="width: 40px">Remove</th>
                    <th>Product Code</th>
                    <th>Product Name</th>
                    <th>Unit price</th>
                    <th>Qty</th>
                    <th>Discount</th>
                    <th>Amount</th>
                </tr>
            </thead>

            <tbody></tbody>
        </table>
    </div>
    <div class="col-sm-4">
        <div class="col s12 m6 offset-m4">
            <div class="form-group" align="left">
                <label class="form-label">Total</label>
                <input type="text" class="form-control" placeholder="Total" id="total" name="total" size="30px" required disabled>
            </div>
            <div class="card" align="right">

                <button type="button" id="save" class="btn btn-info" onclick="addProject()">
                    Print Invoice
                </button>
                <button type="button" id="clear" class="btn btn-warning" onclick="reSet()">Reset</button>
            </div>
        </div>

    </div>
</div>
<hr />
@Html.Partial("Footer");

@Scripts.Render("~/bundles/jquery")

@section scripts{

    <script src="~/Scripts/jquery-3.4.1.js"></script>
    <script src="~/Scripts/jquery-3.4.1.min.js"></script>


    <script src="~/Scripts/jquery.validate.js"></script>


    <script src="//cdn.datatables.net/1.10.19/js/jquery.dataTables.min.js"></script>
    <script src="https://cdnjs.cloudflare.com/ajax/libs/jquery-confirm/3.3.2/jquery-confirm.min.js"></script>


    <script>
        getProductcode();

        function getProductcode() {

            $("#barcode").empty();
            $("#barcode").keyup(function (e) {
                var q = $("#barcode").val();
                if ($('#barcode').val().length === 0) {
                    $.alert({
                        title: 'Error!',
                        content: "Please Enter the Barcode",
                        type: 'red',
                        autoClose: 'ok|2000'
                    });
                    return false;
                }
                $.ajax({
                    type: "POST",
                    url: '/home/Getid?id=' + $("#barcode").val(),
                    dataType: "JSON",
                    success: function (data) {
                        console.log(data);

                        $('#pname').val(data.barcode);
                        $('#pro_price').val(data.price);
                        $("#qty").focus();
                        var sum = (
                            Number(data.price) * 1
                        );
                        $('#total_cost').val(sum);

                    },
                    error: function (xhr, status, error) {
                      //  alert("The barcode entered is not correct");
                    }
                });
                return true;
            });
        }

        $(function () {
            $("#pro_price, #qty").on("keydown keyup click", qty);

            function qty() {
                var sum = (
                    Number($("#pro_price").val()) * Number($("#qty").val())
                );
                $('#total_cost').val(sum);
                console.log(sum);
            }
        });

        function addproduct() {
            var sum1 = (
                Number($("#pro_price").val()) * Number($("#qty").val())
            );

            var product = {
                barcode: $("#barcode").val(),
                pname: $("#pname").val(),
                pro_price: $("#pro_price").val(),
                qty: $("#qty").val(),
                discount: 0,
                total_cost: $("#total_cost").val(),
                button: '<button  type="button" class="btn btn-warning btn-xs")">delete</button>'
            };
            addRow(product);
            //$('#frmInvoice')[0].reset();
        }

        var total = 0;
        var discount = 0;
        var grosstotal = 0;
        var qtye = 0;
        var barcode = 0;

        function addRow(product) {
            var qty = Number($("#qty").val());
            if ($('#barcode').val().length === 0) {
                $.alert({
                    title: 'Error!',
                    content: "Please Enter the Barcode",
                    type: 'red',
                    autoClose: 'ok|2000'
                });
                return false;
            } else {
                var $tableB = $('#product_list tbody');
                var $row = $(
                    "<tr><td><Button type='button' class='btn btn-warning btn-xs' name='record' id='deleterow' >Delete</td>" +
                    "<td>" +
                    product.barcode +
                    "</td><td class=\"price\">" +
                    product.pname +
                    "</td><td>" +
                    product.pro_price +
                    "</td>  <td>" +
                    product.qty +
                    "</td>  <td>" +
                    product.discount +
                    "</td> <td>" +
                    product.total_cost +
                    "</td></tr>");
                $row.data("barcode", product.product_code);
                $row.data("pname", product.product_name);
                $row.data("pro_price", product.price);
                $row.data("qty", product.qty);
                $row.data("discount", product.discount);
                $row.data("total_cost", product.total_cost);
                total += Number(product.total_cost);
                $('#total').val(total);
                discount += Number(product.discount);
                $('#discounttotal').val(discount);
                console.log(product.total_cost);
                grandtotal = total - discount;
                $('#grandtotal').val(grandtotal);
                qtye += Number(product.qty);
                $row.find('#deleterow').click(function (event) {
                    deleteRow($row);
                });
                $tableB.append($row);
                $("#barcode").focus();
                return true;
            }
        }

        function addProject() {
            var table_data = new Array();
            $('#product_list tbody tr').each(function (row, tr) {
                var barcode = parseInt($(tr).find('td:eq(1)').text());
                var pname = $(tr).find('td:eq(2)').text();
                var sum = {
                    //these records i am going to add into sales table
                    'barcode': barcode,
                    'pname': pname,
                    'pro_price': $(tr).find('td:eq(3)').text(),
                    'qty': $(tr).find('td:eq(4)').text(),
                    'total_cost': $(tr).find('td:eq(6)').text()
                };
                table_data.push(sum);
            });
            //these records i am going to add into sales
            var total = $("#total").val();
            console.log(table_data);
            $.post("/home/SaveNew",
                {
                    data: JSON.stringify({
                        total: $("#total").val(),
                        data: table_data
                    })
                },
                function (data, status) {
                    console.log(data);
                    alert("Status: " + status + "\nMessage: " + data.message);
                    window.location.href = "@Url.Action("Print", "Home")"
                });

        }

        function deleteRow(row) {
            //var $tableB = $('#product_list tbody');
            row.remove();
        }
    </script>


}

@section styles{
    <link href="~/Content/bootstrap.css" rel="stylesheet" />

    <link href="~/Content/bootstrap.min.css" rel="stylesheet" />
    <link rel="stylesheet" href="https://cdnjs.cloudflare.com/ajax/libs/jquery-confirm/3.3.2/jquery-confirm.min.css">
    <link rel="stylesheet" href="//cdn.datatables.net/1.10.19/css/jquery.dataTables.min.css">
}
after that create file print.cshtml paste the following code.
@using WebApplication29.Models
@model ajaxModel
@{
var count = 0;
}
<html>
<head>
<title></title>
<meta charset="utf-8">
<meta http-equiv="X-UA-Compatible" content="IE=edge">
<style>
</style>
</head>
<body style='background: #f9f9f9'>
<script>
n = new Date();
y = n.getFullYear();
m = n.getMonth() + 1;
d = n.getDate();
document.getElementById("date").innerHTML = m + "/" + d + "/" + y;
</script>
<div class="container">
<div class="row">
<div class="col-xs-12">
<div class='print' style="border: 1px solid #a1a1a1; font-family: monospaced; width: 88mm; background: white; padding: 10px; margin: 0 auto; text-align: center; ">
<div class="invoice-title" align="center">
<b><tt> Print INVOICE</b><h2>Inventory</h2></tt>
</div>
<div class="invoice-title" align="left" style=" font-family: monospaced;">
<tt> Order # <b> @Model.orderId</b> </tt>
</div>
<div class="invoice-title" align="left">
<tt> Date # <b> @Model.date </b> </tt>
</div>
<div>
<div>
<table class="table table-condensed">
<thead>
<tr>
<td class="text-center"><strong><tt> No </tt></strong></td>
<td class="text-center"><strong><tt>Productname </tt></strong></td>
<td class="text-center"><strong><tt>Qty</tt></strong></td>
<td class="text-center"><strong><tt>Price</tt></strong></td>
@*<td class="text-right"><strong>Total</strong></td>*@
</tr>
</thead>
@foreach (tableViewModel tableModel in Model.data)
{
<tr>
<td class="text-center">
<tt> @(count = count + 1) <tt>
</td>
<td class="text-center">
<tt> @tableModel.pname </tt>
</td>
<td class="text-center">
<tt> @tableModel.qty </tt>
</td>
<td class="text-center">
<tt> @tableModel.pro_price </tt>
</td>
@*<td class="text-right"></td>*@
</tr>
}
</table>
</div>
</div>
<div align="right">
<tt> Sub Total <b> @Model.total</b> </tt>
</div>
<div align="center">
<i><tt> 60 b sea street India </tt></i>
</div>
</div>
</div>
</div>
</div>
</body>
@Scripts.Render("~/bundles/jquery")
@section scripts{
<script src="~/Scripts/jquery-3.4.1.js"></script>
<script src="~/Scripts/jquery-3.4.1.min.js"></script>
<script src="~/Scripts/jquery.validate.js"></script>
<script src="//cdn.datatables.net/1.10.19/js/jquery.dataTables.min.js"></script>
<script src="https://cdnjs.cloudflare.com/ajax/libs/jquery-confirm/3.3.2/jquery-confirm.min.js"></script>
<script>
myFunction();
//
window.onafterprint = function (e) {
closePrintView();
};
function myFunction() {
window.print();
}
function closePrintView() {
window.location.href = '@Url.Action("Index", "Home")';
}
</script>
}
</html>
@section styles{
<link href="~/Content/bootstrap.css" rel="stylesheet" />
<link href="~/Content/bootstrap.min.css" rel="stylesheet" />
<link rel="stylesheet" href="https://cdnjs.cloudflare.com/ajax/libs/jquery-confirm/3.3.2/jquery-confirm.min.css">
<link rel="stylesheet" href="//cdn.datatables.net/1.10.19/css/jquery.dataTables.min.css">
<style type="text/css">
@@media print
{
.button
{
display: none;
}
}
@@media print
{
@@page {
margin-top: 0;
margin-bottom: 0;
}
body {
padding-top: 72px;
padding-bottom: 72px ;
}
}
</style>
}i have attached the video link below. which will do this tutorials step by step