This tutorial will teach you how to make Crud Application using Asp.net Core Entity Framework with Sqlserver Database using Web API access application. This tutorial explains the Code First approach. How to create Restful request and responses.
Install the required Dependencies
Microsoft.EntityFrameworkCore.Design
Microsoft.EntityFrameworkCore.SqlServer
Microsoft.EntityFrameworkCore.Tools
Newtonsoft.Json
First Step Select the Model Folder Right Click and Create the Class Student.cs
Student.cs
[Key]
public int id { get; set; }
public string stname { get; set; }
public string course { get; set;
inside the model create the another class StudentDbContext. StudentDbContext inherits DbContext.inorder to make the
sqlserver database connections.
StudentDbContext
using Microsoft.EntityFrameworkCore;

namespace ReactAspCrud.Models
{
    public class StudentDbContext : DbContext
    {
        public StudentDbContext(DbContextOptions<StudentDbContext> options) : base(options)
        {
        }
        public DbSet<Student> Student { get;set; }

        protected override void OnConfiguring(DbContextOptionsBuilder optionsBuilder)
        {
            optionsBuilder.UseSqlServer("Data Source=.; Initial Catalog=lbs; User Id=sa; password=123; TrustServerCertificate= True");
        }
    }
}
Program.cs
Add these Context inside the Program.cs file
Establish the Database Connection
builder.Services.AddDbContext<StudentDbContext>(options =>
options.UseSqlServer(builder.Configuration.GetConnectionString(“StudentDbContext”)));
Connect the WebApi for Allow the Permissions
app.UseCors(policy => policy.AllowAnyHeader()
.AllowAnyMethod()
.SetIsOriginAllowed(origin => true)
.AllowCredentials());
I attached the full code of Program.cs file where you going paste the above code.
using Microsoft.EntityFrameworkCore;
using ReactAspCrud.Models;

var builder = WebApplication.CreateBuilder(args);

// Add services to the container.

builder.Services.AddControllers();
// Learn more about configuring Swagger/OpenAPI at https://aka.ms/aspnetcore/swashbuckle
builder.Services.AddEndpointsApiExplorer();
builder.Services.AddSwaggerGen();


builder.Services.AddDbContext<StudentDbContext>(options =>
   options.UseSqlServer(builder.Configuration.GetConnectionString("StudentDbContext")));

var app = builder.Build();
app.UseCors(policy => policy.AllowAnyHeader()
                            .AllowAnyMethod()
                            .SetIsOriginAllowed(origin => true)
                            .AllowCredentials());

// Configure the HTTP request pipeline.
if (app.Environment.IsDevelopment())
{
    app.UseSwagger();
    app.UseSwaggerUI();
}
app.UseHttpsRedirection();
app.UseAuthorization();
app.MapControllers();
app.Run();
appsettings.json
Paste the ConnectionStrings
"AllowedHosts": "*",
  "ConnectionStrings": {
    "StudentDbContext": "Server=.;Database=lbs;Trusted_Connection=True;MultipleActiveResultSets=true"
  }
After that Go to Tools->NuGet Package Manager->Package Manager Console
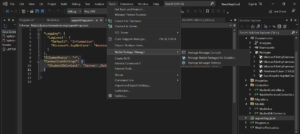
then you can get the console . you have add-migration initial
PM>add-migration initialthen migration files has been created.
after that you have run the command as
update-database
now your database has been created you just open the sqlserver and check them database has created or not at the same time migration folder has been created in your project you can see that.
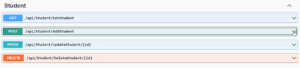
After that Select the Controller Folder Create the new Controller as Student Controller with Web Api.
Student Controller
using Microsoft.AspNetCore.Http;
using Microsoft.AspNetCore.Mvc;
using Microsoft.EntityFrameworkCore;
using ReactAspCrud.Models;

namespace ReactAspCrud.Controllers
{
    [Route("api/[controller]")]
    [ApiController]
    public class StudentController : ControllerBase
    {
        private readonly StudentDbContext _studentDbContext;

        public StudentController(StudentDbContext studentDbContext)
        {
            _studentDbContext = studentDbContext;
        }

        [HttpGet]
        [Route("GetStudent")]
        public async Task<IEnumerable<Student>> GetStudents()
        {
            return await _studentDbContext.Student.ToListAsync();
        }

        [HttpPost]
        [Route("AddStudent")]
        public async Task<Student> AddStudent(Student objStudent)
        {
            _studentDbContext.Student.Add(objStudent);
            await _studentDbContext.SaveChangesAsync();
            return objStudent;
        }

        [HttpPatch]
        [Route("UpdateStudent/{id}")]
        public async Task<Student> UpdateStudent(Student objStudent)
        {
            _studentDbContext.Entry(objStudent).State= EntityState.Modified;
            await _studentDbContext.SaveChangesAsync();
            return objStudent;
        }

        [HttpDelete]
        [Route("DeleteStudent/{id}")]
        public bool DeleteStudent(int id)
        {
            bool a = false;
            var student = _studentDbContext.Student.Find(id);
            if (student != null)
            {
                a = true;
                _studentDbContext.Entry(student).State= EntityState.Deleted;
                _studentDbContext.SaveChanges();
            }
            else
            {
                a = false;
            }
            return a;

        }

    }

}
After that you can check through the swagger.