This tutorial will teach you WPF Entity framework Core implement crud operations step by step. whose who interested in .Net Core Entity framework this is the best place which you learn.
First create a new project
Create new project on textbox type blank select blank solution give the name of the project I given name as StudentCrudApplication

After given the name Click create button.
Black Solution has been created with name of StudentCrudApplication
We should create following Class Libraries
1. Crud.Domain – class library
2. Crud.EF – class library
3.Crud.UI – wpf application
Crud.Domain
After that right click the Solution
Add a new project select WPF Class library

Give the name as Crud.Domain

Click Create.then your Crud.domain has been created.
After that right click the Solution
Add a new project select WPF Class library
After that create another class library as Crud.EF as we did ealiar.
Give the name as Crud.EF

After that right click the Solution
Add a new project select WPF Application

Give the name as Crud.UI

Click Next and Create then
Now you will be able to see structure of the solution
- Crud.Domain
- Crud.EF
- Crud.UI
you can see the screen shot image below

After that select the Crud.EF and right click install the Manage NuGet Packages

ADD the Following DEPENDINIES
- Microsoft.EntityframeworkCore.Sqlserver
- Micosoft.EntityFrameworkCore.Design
- Microsoft.EntityframeworkCore.Tools
Install all Dependencies

Type name of the Dependencies and install them.
Click Install
After complete the installation
Crud.Domain
Select the Crud.domain
Create the folder
Right click the crud.domain add-New folder and name it as Model
Inside the model folder create class file which name is
Student.cs
and paste the code below.
using System;
using System.Collections.Generic;
using System.Text;

namespace Crud.domain.Model
{
    public class Student
    {
        public int id { get; set; }

        public string stname { get; set; }

        public string course { get; set; }

    }
}
Create the Student . inside the class consist of following properties id,stname,course
After that Create the folder inside the Crud.Domain which name is Services
inside the folder have to create the interface which name is IDataService
the purpose of creating the file do the crud operations and called as entity all table are entity crud operation.
IDataService.cs
using System;
using System.Collections.Generic;
using System.Text;
using System.Threading.Tasks;
namespace Crud.domain.Services
{
   public interface IDataService<T> // called as entity all table are entity #crud optation
    {
        Task<IEnumerable<T>> GetAll();
        Task<T> Get(int id);
        Task<T> Create(T entity);
        Task<bool> Delete(T entity);
        Task<T> Update(T entity);
    }
}
select the Crud.EF and create the class which name is StudentDBContext.cs.we have establish the database connection in this file.all the table creation and set as primary key.
modelBuilder.Entity<Student>().HasKey(e => e.id); // set as the primary key here
database connection i will create the separte class and inhert the StudentDBContext class.
StudentDBContext.cs
using Crud.domain.Model;
using Microsoft.EntityFrameworkCore;
using System;
using System.Collections.Generic;
using System.Text;

namespace Crud.EF
{
    public class StudentDBContext : DbContext
    {
        public DbSet<Student> Student { get; set; }

        public StudentDBContext()
        {
        }
        public StudentDBContext(DbContextOptions options) : base(options)
        {
        }
        protected override void OnModelCreating(ModelBuilder modelBuilder)
        {
            modelBuilder.Entity<Student>().HasKey(e => e.id);
        }
    }
}
select the Crud.EF again create another class which name is CrudContextFactory in this file i include the database connection
CrudContextFactory.cs
using Microsoft.EntityFrameworkCore;
using Microsoft.EntityFrameworkCore.Design;
using System;
using System.Collections.Generic;
using System.Text;

namespace Crud.EF
{
    public class StudentContextFactory : IDesignTimeDbContextFactory<StudentDBContext>
    {
        public StudentDBContext CreateDbContext(string[] args = null)
        {
            var options = new DbContextOptionsBuilder<StudentDBContext>();
            options.UseSqlServer("Server=.; Database=studentcrud; Trusted_Connection=True");
            return new StudentDBContext(options.Options);
        }
    }
}
After that we have to create database for run this command.

select Crud.Ef right click set as a started project then go to the main menu
Tools -> NuGet Package Manager -> Package Manager Console
then you can get the console . you have add-migration initial
PM>add-migration initial
then migration files has been created.
after that you have run the command as
update-database
now your database has been created you just open the sqlserver and check them database has created or not.if the database is created after we will do the crud functionality.
Crud.EF
Select the Crud.FF
Create the folder
Right click the Crud.FF add-New folder and name it as Services
Inside the Services folder have to create two classes which are GenericDataService.cs and NonqueryDataService.cs
GenericDataService.cs
using Crud.domain.Services;
using Microsoft.EntityFrameworkCore;
using System;
using System.Collections.Generic;
using System.Text;
using System.Threading.Tasks;

namespace Crud.EF.Services
{
    public class GenericDataService<T> : IDataService<T> where T : class
    {
        private readonly StudentContextFactory _contextFactory;
        private readonly NonqueryDataService<T> _nonQueryDataService;

        public GenericDataService(StudentContextFactory contextFactory)
        {
            _contextFactory = contextFactory;
            _nonQueryDataService = new NonqueryDataService<T>(contextFactory);

        }


        public async Task<T> Create(T entity)
        {

            return await _nonQueryDataService.Create(entity);

        }

        public async Task<bool> Delete(T entity)
        {

            return await _nonQueryDataService.Delete(entity);

        }

        public async Task<T> Get(int id)
        {
            using StudentDBContext context = _contextFactory.CreateDbContext();
            return await context.Set<T>().FindAsync(id);
        }


        public async Task<IEnumerable<T>> GetAll()
        {
            using StudentDBContext context = _contextFactory.CreateDbContext();
            return await context.Set<T>().ToListAsync();

        }

        public async Task<T> Update(T entity)
        {

            return await _nonQueryDataService.Update(entity);
        }
    }
}
NonqueryDataService.cs
using Microsoft.EntityFrameworkCore.ChangeTracking;
using System;
using System.Collections.Generic;
using System.Text;
using System.Threading.Tasks;

namespace Crud.EF.Services
{
    public class NonqueryDataService<T> where T : class
    {

        private readonly StudentContextFactory _contextFactory;
        private readonly NonqueryDataService<T> _nonQueryDataService;

        public NonqueryDataService(StudentContextFactory contextFactory)
        {
            _contextFactory = contextFactory;
        }

        public async Task<T> Create(T entity)
        {

            using StudentDBContext context = _contextFactory.CreateDbContext();
            EntityEntry<T> createdResult = await context.Set<T>().AddAsync(entity);
            await context.SaveChangesAsync();
            return createdResult.Entity;
        }

        public async Task<bool> Delete(T entity)
        {

            using StudentDBContext context = _contextFactory.CreateDbContext();
            context.Set<T>().Remove(entity);
            await context.SaveChangesAsync();
            return true;
        }


        public async Task<T> Update(T entity)
        {
            using StudentDBContext context = _contextFactory.CreateDbContext();
            context.Set<T>().Update(entity);
            await context.SaveChangesAsync();
            return entity;
        }


    }
}
After that select Crud.EF create the another class which name is StudentCrudServices.cs
StudentCrudServices.cs class have to inhert ICrud class
this class consist of all the crud operation and validations.
StudentCrudServices.cs
using Crud.domain.Model;
using Crud.domain.Services;
using Crud.EF.Services;
using System;
using System.Collections.Generic;
using System.Linq;
using System.Text;
using System.Threading.Tasks;

namespace Crud.EF
{
    public class StudentCrudServices : ICrud
    {
        private readonly IDataService<Student> _crudServices;

        public StudentCrudServices()
        {
            _crudServices = new GenericDataService<Student>(new StudentContextFactory());
        }

        public async Task<Student> AddBrand(string stname, string course)
        {
            try
            {
                if (stname == string.Empty)
                {
                    throw new Exception("Student Name Cannot be Empty");
                }
                else
                {
                    Student br = new Student
                    {
                        stname = stname,
                        course = course
                    };
                    return await _crudServices.Create(br);
                }

            }
            catch (Exception ex)
            {
                throw new Exception(ex.Message);
            }
        }

        public async Task<bool> DeleteBrand(int id)
        {
            try
            {
                Student delete = await SearchBrandbyID(id);

                return await _crudServices.Delete(delete);


            }
            catch (Exception ex)
            {
                throw new Exception(ex.Message);
            }
        }
        public async Task<ICollection<Student>> ListBrands()
        {
            try
            {
                return (ICollection<Student>)await _crudServices.GetAll();
            }
            catch (Exception ex)
            {

                throw new Exception(ex.Message);
            }
        }
        public Task<Student> SearchBrandbyID(int ID)
        {
            try
            {
                return _crudServices.Get(ID);
            }
            catch (Exception ex)
            {

                throw new Exception(ex.Message);
            }
        }

        public async Task<ICollection<Student>> SearchBrandByName(string stname)
        {
            try
            {
                var listbrand = await ListBrands();
                return listbrand.Where(x => x.stname.StartsWith(stname)).ToList();

            }
            catch (Exception ex)
            {
                throw new Exception(ex.Message);

            }
        }

        public async Task<Student> UpdateBrand(int id, string stname, string course)
        {
            try
            {
                Student br = await SearchBrandbyID(id);
                br.stname = stname;
                return await _crudServices.Update(br);


            }
            catch (Exception ex)
            {
                throw new Exception(ex.Message);

            }

        }
    }
}
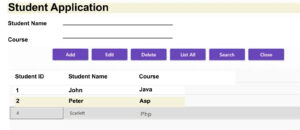
After that select the Crud.UI and select the file MainWindow.xaml double click it and paste the following code.then the UI will be created.
<Window x:Class="Crud.UI.MainWindow"
        xmlns="http://schemas.microsoft.com/winfx/2006/xaml/presentation"
        xmlns:x="http://schemas.microsoft.com/winfx/2006/xaml"
        xmlns:d="http://schemas.microsoft.com/expression/blend/2008"
        xmlns:mc="http://schemas.openxmlformats.org/markup-compatibility/2006"
        xmlns:local="clr-namespace:Crud.UI"
        mc:Ignorable="d"
        Title="Student Crud Application" Height="450" Width="800">

    <Grid>
        <Grid.ColumnDefinitions>
            <ColumnDefinition Width="25"></ColumnDefinition>
            <ColumnDefinition Width="28.261"></ColumnDefinition>
            <ColumnDefinition Width="321.739"/>
            <ColumnDefinition Width="10"></ColumnDefinition>
            <ColumnDefinition Width="270"></ColumnDefinition>
            <ColumnDefinition Width="25"></ColumnDefinition>

        </Grid.ColumnDefinitions>

        <Grid.RowDefinitions>

            <RowDefinition Height="25"></RowDefinition>
            <RowDefinition Height="217*"></RowDefinition>
            <RowDefinition Height="167*"/>
            <RowDefinition Height="25"></RowDefinition>
        </Grid.RowDefinitions>


        <StackPanel
            Grid.Column="1"
            Grid.Row="2" Grid.ColumnSpan="2" Margin="0,167,0,0" Grid.RowSpan="2"
            />

        <StackPanel
            Grid.Column="1"
            Grid.Row="1" Grid.ColumnSpan="2" Grid.RowSpan="2">

            <Grid>
                <Grid.ColumnDefinitions>

                    <ColumnDefinition Width="100"/>
                    <ColumnDefinition Width="250"/>
                </Grid.ColumnDefinitions>
                <Grid.RowDefinitions>
                    <RowDefinition Height="25"></RowDefinition>
                    <RowDefinition Height="5"></RowDefinition>
                    <RowDefinition Height="25"></RowDefinition>
                    <RowDefinition Height="5"></RowDefinition>
                    <RowDefinition Height="25"></RowDefinition>
                    <RowDefinition Height="25"></RowDefinition>
                </Grid.RowDefinitions>


                <Label
                    Content="Student ID"
                    Grid.Row="0"
                     Grid.Column="0" >
                </Label>

                <TextBox
                    x:Name="txtStudentID"
                    Grid.Row="0"
                     Grid.Column="1"
                 />


                <Label
                    Content="Student name"
                    Grid.Row="2"
                     Grid.Column="0" >
                </Label>

                <TextBox
                    x:Name="txtStudent"
                    Grid.Row="2"
                     Grid.Column="2"
                 />


                <Label
                    Content="Course"
                    Grid.Row="4"
                     Grid.Column="0" >
                </Label>

                <TextBox
                    x:Name="txtCourse"
                    Grid.Row="4"
                     Grid.Column="2"
                 />

                <!--Button-->
                <StackPanel
                     Grid.Row="12"
                     Grid.ColumnSpan="2"
                     Orientation="Horizontal"
                    >

                    <Button
                        Width="50"
                        Content="Add"
                        x:Name="ButtonAdd"
                        Margin="10 0 10 0"
                        Click="ButtonAdd_Click"
                        />

                    <Button
                        Width="50"
                        Content="Update"
                        x:Name="ButtonEdit"
                        Margin="10 0 10 0"
                        />
                    <Button
                        Width="50"
                        Content="Search"
                        x:Name="ButtonSearch"
                        Margin="10 0 10 0"
                        />
                    <Button
                        Width="50"
                        Content="Delete"
                        x:Name="ButtonDelete"
                        Margin="10 0 10 0"
                        />
                    <Button
                        Width="50"
                        Content="List"
                        x:Name="ButtonList"
                        Margin="10 0 10 0"

                        />
                </StackPanel>


            </Grid>

        </StackPanel>

        <DataGrid
            Grid.Column="4"
            Grid.Row="1"
            x:Name="DataGridBrand"
            Margin="5,5,5,5" Grid.RowSpan="2">


        </DataGrid>

    </Grid>

</Window>
After that double click the MainWindow.xaml.cs for writting the code
MainWindow.xaml.cs
using Crud.domain.Model;
using Crud.EF;
using System;
using System.Collections.Generic;
using System.Linq;
using System.Text;
using System.Threading.Tasks;
using System.Windows;
using System.Windows.Controls;
using System.Windows.Data;
using System.Windows.Documents;
using System.Windows.Input;
using System.Windows.Media;
using System.Windows.Media.Imaging;
using System.Windows.Navigation;
using System.Windows.Shapes;

namespace Crud.UI
{
    /// <summary>
    /// Interaction logic for MainWindow.xaml
    /// </summary>
    public partial class MainWindow : Window
    {
        private readonly StudentCrudServices _crudServices;
        public MainWindow()
        {
            InitializeComponent();
            _crudServices = new StudentCrudServices();

            ButtonAdd.Click += ButtonAdd_Click;
            ButtonList.Click += ButtonList_Click;
            DataGridBrand.SelectionChanged += DataGridBrand_SelectionChanged;

            ButtonEdit.Click += ButtonEdit_Click;

            ButtonDelete.Click += ButtonDelete_Click;


            ButtonSearch.Click += ButtonSearch_Click;
        }

        private async void ButtonEdit_Click(object sender, RoutedEventArgs e)
        {

            try
            {
                if (txtStudentID.Text != string.Empty && txtStudent.Text != string.Empty)
                {
                    await _crudServices.UpdateBrand(int.Parse(txtStudentID.Text), txtStudent.Text, txtCourse.Text);
                    throw new Exception("Data Successfully Updateddd");
                }
            }
            catch (Exception ex)
            {
                MessageBox.Show(ex.Message);
            }
            finally
            {
                await ListBrands();
            }


        }

        private async void ButtonDelete_Click(object sender, RoutedEventArgs e)
        {
            try
            {
                if (txtStudentID.Text != string.Empty && txtStudent.Text != string.Empty && txtCourse.Text != string.Empty)
                {
                    await _crudServices.DeleteBrand(int.Parse(txtStudentID.Text));
                    throw new Exception("Data Successfully Deleteddd");
                }
            }
            catch (Exception ex)
            {
                MessageBox.Show(ex.Message);
            }
            finally
            {
                await ListBrands();
            }
        }

        private async void ButtonSearch_Click(object sender, RoutedEventArgs e)
        {
            var SearchName = await _crudServices.SearchBrandByName(txtStudent.Text);
            DataGridBrand.ItemsSource = SearchName.ToList();
        }

        private void DataGridBrand_SelectionChanged(object sender, SelectionChangedEventArgs e)
        {
            try
            {
                var activelist = (Student)DataGridBrand.CurrentItem;

                if (activelist != null)
                {
                    txtStudentID.Text = activelist.id.ToString();
                    txtStudent.Text = activelist.stname;
                    txtCourse.Text = activelist.course;
                }

            }
            catch (Exception ex)
            {
                MessageBox.Show(ex.Message);
            }
        }

        private async void ButtonList_Click(object sender, RoutedEventArgs e)
        {
            try
            {
                await ListBrands();

            }
            catch (Exception ex)
            {
                MessageBox.Show(ex.Message);
            }
        }

        private async Task ListBrands()
        {
            var brandList = await _crudServices.ListBrands();
            DataGridBrand.ItemsSource = brandList.ToList();
        }

        private void ButtonAdd_Click(object sender, RoutedEventArgs e)
        {
            try
            {
                _crudServices.AddBrand(txtStudent.Text, txtCourse.Text);


                throw new Exception("Data Successfully Addedd");
            }
            catch (Exception ex)
            {
                MessageBox.Show(ex.Message);

            }
            finally
            {
                txtStudentID.Clear();
                txtStudent.Clear();
                txtCourse.Clear();
                txtStudentID.Focus();
            }
        }
    }


}