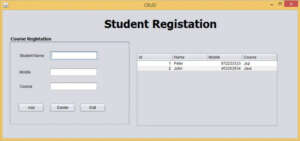
This tutorial will teach you jdbc crud operations in java how to do the basic database functions that are CREATE RETIEVE UPDATE and DELETE using Mysql Database. The INSERT, SELECT, UPDATE and DELETE statements can be used in any database system, because this is support by all relational database systems.
java crud mysql database are easy to use make a crud application. crud operations in java are must when you developing a java mini projects. learn how learn how to INSERT, SELECT, UPDATE and DELETE in database by writing code to manage the records table in the database named linda. records table consist of following columns name,course,fee.
we will do the java best practice for understand java programming clearly and easily.
Feature of projects
- The system shall be able to record student details : name,course,fee.
- The system shall be able to retrieve the student details : name,course,fee.
- Then system shall be able to Edit and Delete the student details : name,course,fee .
Learn how to make this System Step by step
Step 1: Download JDK Click here follow the steps and install it.
Step 2: Download an appropriate jdbc driver Click here in order to connect jdbc and mysql.
Step 3: Download xampp server Click here follow the steps and install it.
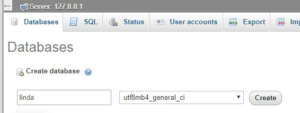
After installed xampp server in your computer. you shall be able to create databases. I attached screen shot below to create the database.
Create the Database name linda
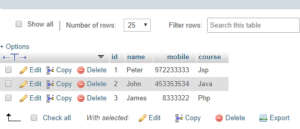
After created the database have to create the table which name is “records” the table consist of following Columns name,mobile,course.
AddRecords
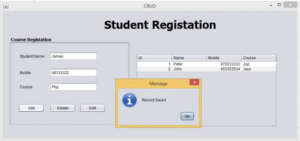
you can use the following code snippet to add the records in to database. paste the code inside the add button
String name =txtname.getText();
String age =txtmobile.getText();
String course =txtcourse.getText();

      try {
          Class.forName("com.mysql.jdbc.Driver"); //Register the mysql driver
          con1 = DriverManager.getConnection("jdbc:mysql://localhost/linda","root","");
          insert = con1.prepareStatement("insert into record (name,mobile,course)values(?,?,?)");
          insert.setString(1,name);
          insert.setString(2,age);
          insert.setString(3,course);
          insert.executeUpdate();
          JOptionPane.showMessageDialog(this, "Record Saved");


          txtname.setText("");
          txtmobile.setText("");
          txtcourse.setText("");
          table_update();

      } catch (ClassNotFoundException ex) {
          Logger.getLogger(crud.class.getName()).log(Level.SEVERE, null, ex);
      } catch (SQLException ex) {
          Logger.getLogger(crud.class.getName()).log(Level.SEVERE, null, ex);
      }
View Records
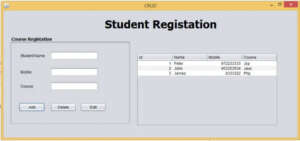
you can use the following code snippet to retrieve the data stored in the database and present it to users in a proper format. create a method table_update() .paste the method inside the constructor of the class.when the form is loaded all the records will be shown on the jTable.
private void table_update() {
        int CC;
        try {
            Class.forName("com.mysql.jdbc.Driver");
            con1 = DriverManager.getConnection("jdbc:mysql://localhost/linda","root","");
            insert = con1.prepareStatement("SELECT * FROM record");
            ResultSet Rs = insert.executeQuery();

            ResultSetMetaData RSMD = Rs.getMetaData();
            CC = RSMD.getColumnCount();
            DefaultTableModel DFT = (DefaultTableModel) jTable1.getModel();
            DFT.setRowCount(0);

            while (Rs.next()) {
                Vector v2 = new Vector();

                for (int ii = 1; ii <= CC; ii++) {
                    v2.add(Rs.getString("id"));
                    v2.add(Rs.getString("name"));
                    v2.add(Rs.getString("mobile"));
                    v2.add(Rs.getString("course"));
                }
                DFT.addRow(v2);
            }
        } catch (Exception e) {
        }
    }
Form Constructor
public crud()
     {
        initComponents();
        table_update();  // when the form is loaded all the records will be shown on the jTable.
     }
Edit return
you can use the following code snippet to select row of the jTable.after selected the row records will displyed in a relavent jTextfields.
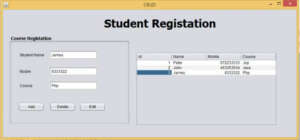
Paste code inside the jTableMouseClicked event
DefaultTableModel model = (DefaultTableModel) jTable1.getModel();
int selectedIndex = jTable1.getSelectedRow();

txtname.setText(model.getValueAt(selectedIndex, 1).toString());
txtmobile.setText(model.getValueAt(selectedIndex, 2).toString());
txtcourse.setText(model.getValueAt(selectedIndex, 3).toString());
Edit
you can use the following code snippet to Edit the records.
Paste code inside the Edit button.
DefaultTableModel model = (DefaultTableModel) jTable1.getModel();
int selectedIndex = jTable1.getSelectedRow();
try {
int id = Integer.parseInt(model.getValueAt(selectedIndex, 0).toString());
String name =txtname.getText();
String mobile =txtmobile.getText();
String course =txtcourse.getText();
Class.forName("com.mysql.jdbc.Driver");
con1 = DriverManager.getConnection("jdbc:mysql://localhost/linda","root","");
insert = con1.prepareStatement("update record set name= ?,mobile= ?,course= ? where id= ?");
insert.setString(1,name);
insert.setString(2,mobile);
insert.setString(3,course);
insert.setInt(4,id);
insert.executeUpdate();
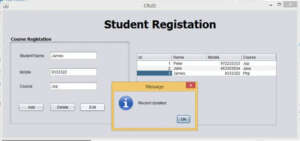
JOptionPane.showMessageDialog(this, "Record Updated");
txtname.setText("");
txtmobile.setText("");
txtcourse.setText("");
table_update();
} catch (ClassNotFoundException ex) {
} catch (SQLException ex) {
}Delete
you can use the following code snippet to Delete the records.
Paste code inside the Delete button.
DefaultTableModel model = (DefaultTableModel) jTable1.getModel();
int selectedIndex = jTable1.getSelectedRow();
try {
int id = Integer.parseInt(model.getValueAt(selectedIndex, 0).toString());
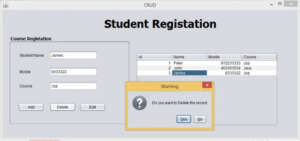
int dialogResult = JOptionPane.showConfirmDialog (null, "Do you want to Delete the record","Warning",JOptionPane.YES_NO_OPTION);
if(dialogResult == JOptionPane.YES_OPTION){
Class.forName("com.mysql.jdbc.Driver");
con1 = DriverManager.getConnection("jdbc:mysql://localhost/linda","root","");
insert = con1.prepareStatement("delete from record where id = ?");
insert.setInt(1,id);
insert.executeUpdate();
JOptionPane.showMessageDialog(this, "Record Delete");
txtname.setText("");
txtmobile.setText("");
txtcourse.setText("");
table_update();
}
} catch (ClassNotFoundException ex) {
} catch (SQLException ex) {
}
Related Tutorials
Book Shop Inventory Management System in Java
https://www.tutussfunny.com/java-inventory-system/
Fried Rice shop Inventory Management System in Java Mysql
https://www.tutussfunny.com/inventory-management-java/
Product Inventory JDBC CRUD tutorial Insert,Update,Delete,Search
https://www.tutussfunny.com/javajdbc-crud/
JDBC Microsoft Sql server CRUD Step by Step
https://www.tutussfunny.com/jdbc-microsoft-sql-server-crud-step-by-step/
Advance Bus Ticket Booking System in Java Mysql
https://www.tutussfunny.com/advance-bus-ticket-booking-system-in-java-mysql/
Point of sales System with Bill Print Using Java and Mysql
https://www.tutussfunny.com/point-of-sales-system-with-bill-print-using-java-and-mysql/
i have attached the video link below. which will do this tutorials step by step.
Java Best Transaction Projects. This is very useful tutorials for your future project